The MacValley blog
![]()
Welcome to the MacValley blog, your first stop for all the latest MacValley news and views.
|
The MacValley blog Editor: Tom Briant
|
Labels used in posts
|
To search the blog posts please use the box below
Thursday, July 4, 2019
Saturday, May 25, 2019
The Four Things That Kill Your iPhones Battery The Fastest
1. Screen Brightness Isn’t Your Friend
2. Feral Apps
3. Hordes Of Notifications Swamping Your Lock Screen
4. Putting Your Battery Life In The Freezer
Final Observation
Wednesday, April 17, 2019
Apple News and Views for Wednesday, April 17, 2019
Apple News and Views for Wednesday, April 17th, 2019
- Apple and Qualcomm’s legal battle…has come to an end. Apple and Qualcomm, fighting over Apple’s next cellphone modem, reached a settlement. An Apple iPhone with a Qualcomm 5G modem is expected in 2020.
- Wisconsin’s governor wants to renegotiate the Foxconn deal. This deal was touted as bringing thousands of jobs to Wisconsin. It’s not going to happen.
- In other news, the President of Foxconn makes noises about running for President of Taiwan.
- Back to the Mac. Jason Snell in Macworld opines on how working on the Mac will change as macOS and iOS share code.
- Using your iPad as a second display has proven popular. Will Apple integrate it into macOS 10.15? Stay tuned…
- And in a development straight out of Mel Brook’s classic film The Producers, investors have filed suit against the producer of Nerds, a musical based on the rivalry & friendship between Steve Jobs and Bill Gates.
Your editor remains stuck in the past, running his late 2011 Mac mini with macOS 10.13.6. He doesn’t plan to upgrade until he pays off his car. By that time, Apple may switch to its own CPU for the Mac.
He would remind his readers itching to upgrade of this. George R. R. Martin of Game of Thrones wrote those books on an antique 486 running MS-DOS. He deliberately disconnected it from the ‘Net. He writes with Wordstar without a spell checker, so the spellings of Westeros do not get flagged.
Tom Briant
Editor, MacValley Blog
Sunday, March 10, 2019
Commander 1-Free Dual-Pane File Manager for Your Mac

One of our members asked me for an easy way to transfer files from one folder to another.
I advised her to download and install Commander 1 from Eltima Software. For the money, it provides the best dual-and file manager you can get.

Now you download it for free from either Eltima’s Website or from the Mac App Store.
Features You Will Enjoy
You will enjoy the convenience of two side-by-side panes. You won’t waste time setting up two Finder windows
If you want to swap the left and right panes, go up to the Command drop-down menu to select that command. You can do it even quicker by pressing the Shift+Option/Alt+E keys.
Along the bottom, you’ll see a row Function Key commands. Through the Preferences menu for ViewerYou can pick which viewer app you want to use, either Commander 1’s own or macOS’s QuickLook or Preview


So, What’s the Catch
The Catch to this great deal is that Eltima makes its money from people who buy the Pro Pack. For the first 15 days after your download you can try out the Pro Pack features.

If you want them after the trial period, you need to buy a license for $29.99 from Eltima.
If you decide to skip activating the Pro Pack, you still have all the free feature forever.
If you often wish for a dual-pane file manager instead of wrangling the Finder’s windows, I highly recommend. For the price, it can’t be beat.
Commander 1 Free with a $29.99 Pro Pack available after 15 day trial period.
P.S.
If you’d like to save a few bucks, find the press release and read it.
Tom Briant
Editor, MacValley Blog
Monday, February 4, 2019
Decluttering Your Mac of duplicate files
I recently worked on cleaning out and clearing my boot drive. I got it down to below 300 Gb in used space. Still bloated blue whale size, but an improvement. Digital decluttering has begun!
I haven’t read Marie’s Kondo’s decluttering books. To be honest, I have read lots of other books on decluttering. I suspect a lot of these methods are universal.
How I did It
First, I found out which Rooms (folders and sub-folders) contained the most digital debris. I used the OmniDiskSweeper tool from the Omnigroup. Yes, the same people who make those other great Omni apps.
This one is free. You pick a drive or partition to sweep.


The app gets to work, sorting through all your files. It will say “sizing” in the titlebar of the window as it sweeps. It also shows the number of gigabytes swept so far.

When done, you will see a number showing the size of all your files in the titlebar. All your files, even the hidden fatbombs you forgot about.
Below in the window, you will see to the left all your top-level folders, both visible and otherwise hidden, by size.
Your /User folder will usually be the biggest.
Click on the size displayed to break it down further by subfolders.

In case you prefer a graphical display of your fattest folders, I can recommend Daisy Disk or GrandPerspective.


Duplicates, Duplicates, Duplicates
I have a lot of duplicate files. I’ve downloaded the same file twice or I have an earlier and later version. How do I find all the duplicate files?
A lot of the time, you know where you put duplicate files. You just want to search 1 or 2 folders. A lot of duplicate file finders, though, search the whole disk or partition first. You get a huge list of duplicates.
Gemini 2 from MacPaw allowed me to search only my selected folders.
I could weed out the duplicate files, placing a checkmark next to the duplicates to send to the Trash.
I got rid of 2.17 gigabytes of excess PDFs within an hour from just two folders of e-books. This beat sifting through a whole 1 Terabyte hard drive’s worth of duplicates.
Step 1
Boot Up Gemini 2. I should warn you it has proven unstable at times, probably due to constructing tables in memory. This increases speed, but can prove unstable.
To reach this screen, press Command + N for New Scan

Now drag the folder(s) you want to examine to the center circle. You’ll see a green symbol with a cross. You can release the mouse button.

This screen means Gemini 2 has accepted your files for scanning. Click on the green button “Scan for Duplicates"

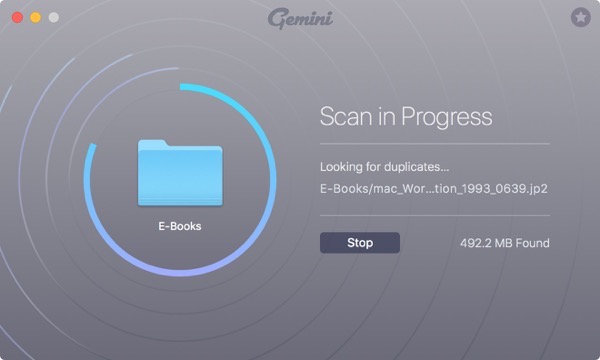
You’ll see this screen as Gemini 2 scans your folder and sub-folders for duplicate files. Give it time.

Gemini 2 has finished its wowrk. Now you can see the list of duplicates arranged by size

Gemini 2 displays the selected set of duplicates. Over to the right, you’ll see a display of the first page of a PDF

This is a closer view of what you see when choosing duplicate files to delete. Click on the rightward facing arrow next to the file title.
This displays the files and their paths.

Choose a file to delete and this is what you see.

Over at the lower right-hand corner, you see the total amount of files selected for deletion and the button to click to delete them.
![]()
You’ve deleted your first set of files. Congratulations. Wanna go back for more, or call it a day? It’s your choice.
Gemini 2 will start over where you left on the next time you boot the app up.

Tom Briant
Editor MacValley Blog
Apple News and Views for Monday 02-04-2019
Apple News and Views for Monday, 2/3/2019
How do they stand all that rain in Seattle? Just asking…
How to Reinstall macOS if macOS Recovery is unavailable
In other words, you’ve wiped the boot drive and don’t have an installer handy.
I assume you read this on your computer at work or another computer at home.
The most useful Siri Shortcuts for iPhone
Guess I need a better phone than my 5C
How to set up a Mac and macOS to take advantage of an internal SSD and external storage setup
Macworld finally took notice of this hack to make your /User directory portable.
How to Give your 2012 or 2014 Mac mini a performance boost by replacing the hard drive with an SSD
If you bought a 2012 or 2014 Mac mini and want to bump up its performance, you can do it! Read the article to find out how.
Apple needs blockbuster acquisitions in gaming & video streaming to thrive, claims J.P. Morgan
Wall Street (those wonderful people who brought you 2008) wants Apple to buy Netflix and Activision.
Apple Watch Series 4 fall detection summons emergency services, saves elderly man.
Another reason to get an Apple Watch.
Tim Cook admits that higher iPhone prices are a ‘factor’ in declining upgrade rates
You think so, Tim?
Marie Kondo tries to get my digital life in order
How to KonMari Your Way to a Happier Digital Life
Today the closets, tomorrow the hard drives!
I searched on the topic “Marie Kondo digital” in Google. A lot of articles popped up.
Review: HP Tango X, an AirPrint printer that tries to look like a book
Adventures in making a printer not look like a large ugly plastic object in your stylish home.
Tom Briant
Editor, MacValley Blog
Saturday, February 2, 2019
Did you backup your computer today?
Dear Friends:
Did you back up your computer lately?
Today in Southern California the weather is wet and blustery. Good day to stay inside, watch Netflix or read Agatha Christie novels.
But you must make sure you backed up your Mac!
If you don’t know how to back up your Mac using Time Machine, Apple has you covered here.
Tom Briant
Editor MacValley Blog
Saturday, January 19, 2019
How to Read and Write to a USB floppy drive through MacOS
I have found a way to access floppy drives in MacOS.
This technique uses readily available software and hardware.
It doesn’t involve the Terminal.
It doesn’t involve undocumented commands within MacOS that may go away with the next update.
I have tried this technique on both macOS 10.13.6 on a 2011 Mac mini and 10.14.2 on a 2014 MacBook Air.
Let’s proceed!
How He do it?
Parallels Desktop 14 and Ubuntu Linux 18.04 lie at the heart of this technique.
Ubuntu Linux 18.04 can access a floppy drive, unlike macOS and Windows 10.
Parallels Desktop 14.1 includes a simple way to install Ubuntu as a guest OS under macOS and can access both the host operating system’s User folder and the USB floppy drive.
Step #1:
Go to the Parallels website here to download a trial version. You can try it for 14 days before committing to buying it.
It comes as an installer. Double-click on it and follow the on-screen instructions.
Step #2:
Within Parallels Desktop, go to the File… menu and select New.

Step #3:
You will see a Create New screen offering several options.
You want the Download Ubuntu Linux, next to the orange dot with the white lines.

Step #4:
Click on the orange Ubuntu Linux circle to select it. You will see a light-blue square with rounded corners overlay it.
Now click on the blue Continue button at the lower right-hand corner.

Step #5:
You will see a screen briefly describing Ubuntu Linux and the company producing it, Canonical Ltd.
Click on the blue Download button in the lower right-hand corner

Step #6:
The download will start. How long it takes depends on the speed of your Internet connection. Wired connections will run faster than Wi-Fi.
This screenshot was taken with a computer on a wired Internet connection.

Step #7:
After the download of the compressed archive file finishes, it will take a moment to unarchive the file.

Step #8:
You enter your new password. You will type it again in the next step to confirm it’s the right password

Step #9:
Retype the password to confirm it’s the correct one.

Step #10:
Click on the Orange Parallels box. Parallels is your user name, assigned to you by Parallels Desktop’s auto installer.

Step #11:
Type in your password
Step #12: Success!
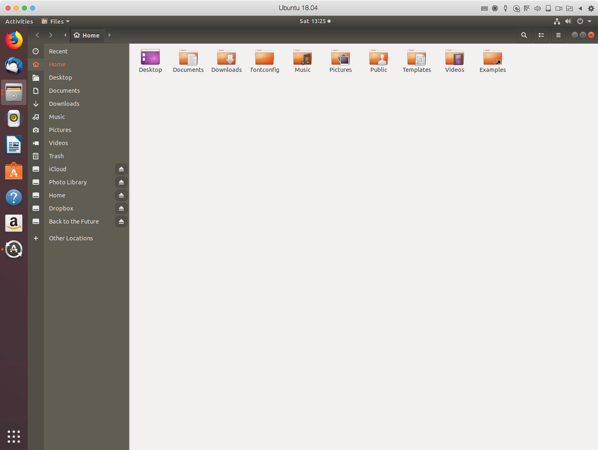
You’ve arrived at the Ubuntu Linux Desktop

Step #13: Attach the floppy drive.
If you haven’t plugged the floppy drive into a USB port, do so now.
To connect the floppy drive to the Ubuntu Linux, you need to go up to the Devices Menu. This is part of Parallels Desktop itself.
Step #14: The Devices Menu
Now you see the Devices menu with its drop-down file item for USB & Bluetooth.
Click on the USB & Bluetooth item. You get the physically attached USB Floppy Drive.
Click on the item for the USB Floppy Drive to connect it to the Ubuntu Linux.

Step #15: The Floppy Disk Icon Appear on the Ubuntu Desktop
The Floppy Disk icon with the name of the floppy (in this case, it’s DATA0704) appears on screen.
You have to put in a real floppy to make the floppy drive work. You’ll get an error message if you don’t.
In case of error message, just stick in a floppy disk.
![]()
Step #16: Open the Home Folder.
A bit of explanation. For the MacOS, the User folder is where the user’s documents are stored.
In Linux, the Home folder is where the user’s documents are stored.
So here, If you click on the Parallels Shared Folders to see a folder named Home, it’s the MacOS Users folder.

Step #17: Apologies for Confusion.
Ideally, you should babysit this process from start to finish in case you need to intervene. It should take about an hour.
I tried this twice today on the same Mac mini. One time, no problems. The second time, I needed to shut down the whole Parallels Desktop software. After I restarted it a few minutes later, everything worked fine.
You should undertake this with a patient attitude. The installation of the Shared Folders can get a little hairy at times. You may see a box asking for your password. If so, you should enter it.
My conclusion after working with this is that this is the simplest method of gaining access to a floppy drive through a Macintosh running 10.13 or 10.14 without involving a second physical computer.
This Parallels Desktop software is worth the $79.99. I tried using the free VirtualBox 6.0 software from Oracle. I spent four unsuccessful hours trying to replicate what I did in less than an hour with Parallels. Spend the money! You’ll get what you paid for in this case. Your time is worth at least $20/hour. Remember that!
The command you’ll use most often is the “Control + Alt/Option” combo to free your cursor from Ubuntu Linux. Remember it, Control + Alt/Option.
Good Luck, be patient, and rejoice when this works.
Thomas Briant
Editor, MacValley Blog
thomasbriant@me.com
Tuesday, January 1, 2019
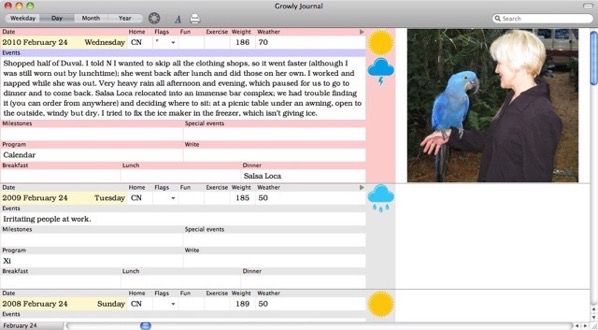
Start With Growly Journal for your new 2019 Journal
Did you vow to start a journal in 2019?
If you have the determination, but need an app to start with…may I suggest Growly Journal from Growly Bird Software?
Advantages:
1. It’s free
2. It gives you categories for entering data in case of brain freeze.
3. It exports to a per-entry plain text format.

Sure, you can get fancier apps and pay up to $40 for them. Why not start with Growly Journal?
Tom Briant
Editor, MacValley Blog


