


The MacValley blog

Welcome to the MacValley blog, your first stop for all the latest MacValley news and views.
|
The MacValley blog Editor: Tom Briant
|
|

Sunday, March 12, 2017
Senior Correspondent Arnold Woodworth's Weekly Web Wrap-up for Sunday, 3-12-2017
The reason why is because joining the MFi program requires the company to apply for a license, which it has to pay for. The benefits are guaranteed compatibility and being able to put an MFi tag on their product boxes. But in a market like cables where profit margins are razor thin, it can be seen as an unnecessary expense. Larger companies can afford to pay the licensing fee and keep their prices low, but there are a bunch of uncertified accessories out there.
http://www.businessinsider.com/top-100-websites-web-traffic-2017-3
http://www.visualcapitalist.com/wp-content/uploads/2017/03/top-100-websites.html
Initial review of documentation revealed in the WikiLeaks publication of the "Vault 7" program documentsshows a CIA having problems with combining all four factors on the newest Apple gear and software at the same time.
... US spy agency is able to hack into Samsung smart TVs and use them as covert microphones.
http://www.businessinsider.com/wikileaks-claims-cia-mi5-hacked-samsung-smart-tvs-microphones-vault-7-2017-3
The release of documents that purportedly describe hacking of consumer gadgets by the Central Intelligence Agency fueled new concern in the technology industry that U.S. intelligence agencies are working at odds with tech companies.
One expert who examined the dump, Rendition Infosec founder Jake Williams, told Business Insider it appeared legitimate.
The leak follows other incidents in recent years that have driven a wedge between the tech industry and the U.S. national security apparatus — most notably Edward Snowden’s 2013 revelations of U.S. surveillance programs. Those episodes have made tech companies wary of cooperating with the federal government on issues involving customer privacy.
http://www.marketwatch.com/story/wikileaks-release-likely-to-drive-deeper-wedge-between-spies-tech-companies-2017-03-07
Video:
Hackers and governments can see you through your phone’s camera — here’s how to protect yourself
Exploits for iPhones cost about $1.5 Million each.
Exploits for Android phones are much cheaper — about $200,000 each — because it’s much easier to exploit an Android phone.
To protect yourself, always make sure you’re using the latest version of Apple’s iOS.
http://www.businessinsider.com/hackers-governments-smartphone-iphone-camera-wikileaks-2017-3
Last year, Hollywood released a biographical political thriller based on the life of Edward Snowden that had one particularly creepy scene.
In that scene, a government spook used a program to remotely activate the microphone and camera on a laptop, and by doing so he was able to watch a woman as she got undressed. Sadly, as you will see below, this kind of thing is happening constantly. Any digital device can potentially be accessed and used to spy on you even if it appears to be turned off.
https://www.infowars.com/government-spooks-can-use-the-mic-and-camera-on-trumps-phone-even-when-he-thinks-it-is-turned-off/
"If one would give me six lines written by the hand of the most honest man, I would find something in them to have him hanged.”
Well, law-abiding citizens do have reason to fear. They do have reasons to secure their devices, their files, and their communications with loved ones.
This unprecedented attack is a wake-up call for North American utilities.


Monday, March 6, 2017
Senior Correspondent Arnold Woodworth's Weekly Web Wrap-up for Sunday 3-5-2017
Innovation? Arguable. Implementation? Definitely.
It’s often just a fancy name for a computer program.
My cable company now offers hundreds of options.
As many others have documented, Twitter throttles back the tweets of people who hold political views they don’t like.
Advertised as “a message you can hug,” CloudPets toy company allows parents to record and send messages through the accompanying app to their child’s teddy bear.
Analysts reportedly tucked classified information about Russian hacking inside Intellipedia for safekeeping.
Sunday, March 5, 2017
How to Successfully Network between macOS, Ubuntu Linux, and Windows using the Dukto file-transfer app
In my last two articles, I wrote about setting up secure networks using SSH and SFTP. Now I’m going to switch gears and tell you about a not-so-secure file transfer app designed strictly for use on a Local Area Network where you trust all the users.
The name of the app is Dukto and Emanuele Colombo, an Italian software developer and engineer, wrote it for OS X, for Linux, and for Windows.
This is Dukto on my Ubuntu MATE machine. You can get it for both 32-bit and 64-bit versions of Linux

This is Dukto for macOS. It’s available for 10.6 on up. I’m using it on 10.12.3.

This is Dukto for Windows 10

It’s not a secure, locked-down networking app. You install it on each of your computers, start up the app, and they all start recognizing each other on the local area network. You can send and receive files, folders, text files and text from the clipboard via Dukto to your various computers.
THERE ARE NO PASSWORDS. Which may be a blessing or a curse, depending on the circumstances. Your mileage may vary, caveat emptor, and so on and so forth.
Now you have to send them from a computer to a computer. Unlike shared drives, where you can see the drive on the other computer, you can’t see the files or folders on the other computer. So use the text feature to tell someone else to send files to you that you asked for last Wednesday.
It’s a really nice app for when you don’t need an elaborate network and you don’t have the time to set up passwords and security fingerprints and such. You just want the files from the other computer sent to your computer ASAP.
How do I set it up?
With macOS, you download the .dmg file from msec.it, Mr. Colombo’s Web site with links to all the versions for various operating systems.. It’s the same install process, drag and drop from the mounted .dmg file into your /Applications folder, as you’ve done before.
Here’s a link to the Sourceforge.net site, which also has links to the other versions for other OS.

With Windows, you can get it at the Windows 10 Store (which is where I got my copy), or from Mr. Colombo’s Web site or from various download sites. It even has a portable version you could install. On a flash drive.
The link above is for the OS X version. Look below the green box for the OS X version and you will see a link for Browse all files. You will see the Windows installer. Download the Windows installer, double-click on it, and follow the prompts.

The Linux versions are hosted at the OpenSUSE Web site. You can install from the Terminal by copying and pasting the command lines posted on the Web site into your Terminal, or just scroll down for the binary .deb files for Ubuntu and .rpm for Fedora.
Download the .deb installer file for Ubuntu, double-click on it and follow the prompts from the graphic Gdebi installer app. Remember, you want the R6 version, the latest one.
How do I use it once I’ve installed it on my computers?
Go to your applications menu, click on the flower pot icon, and you’re ready to go.
It should identify the other instances of Dukto on the network, so that you can just click on a “buddy” to send files, folders, or text to.
Dukto lets you use the file dialog box of your system to pick which files and folders to send, or you can just drop and drag them from your File Manager onto Dukto. Either way, Dukto sends the files over to your buddy immediately.
You can select which folder/directory to save files into.
That’s about it. It’s as simple a file sending app as can be. It’s not designed for security, so don’t even consider using it outside of a closed Local Area Network. It’s a convenient way to link multiple computers of disparate operating systems together.
And if you like this app, please consider donating via Paypal to Mr. Colombo. He’d appreciate it.
Tom Briant
Editor, MacValley Voice.
How to Successfully Network from Ubuntu Linux back to macOS 10.12.3 Part II
I’m sure when you set out to network your Ubuntu Linux machine, or any other Linux machine for that matter, over to your Mac...you ran into difficulties.
First off, you followed the instructions for sharing from a Ubuntu Linux machine. It’s simple.
You right-clicked on the folder you wish to share and click on “Share This Folder” From there, you just followed the steps as laid out for you by your Linux distro. Simple and straightforward.
Then you went back to your Mac and looked on the Finder’s Sidebar for shared devices. You found your shared folders. You double-clicked on them. Up popped a dialog box. So far, so good.
You entered your Linux user name and your Linux password. Over and over again. This got old real fast.
What is wrong here? I’ll tell you what’s wrong. How Linux uses the SAMBA SMB networking protocol differs markedly from how macOS 10.12.3 uses the SMB networking protocol. They are totally incompatible. You’ll end up tearing out what little hair you have left over this.
So relax, have a refreshing beverage, and continue to read. I’m going to show you how to network your Linux machine, in this case stock Ubuntu 16.04, with my Mac Mini running macOS 10.12.3.
THE GUIDING PRINCIPLE HERE IS TO FORGET ABOUT SMB AND GO WITH SSH AND SFTP AND AFP.
I have found two ways to network a Ubuntu Linux machine to a Mac. One takes five minutes, but requires a little terminal work in Linux.
The second one takes more terminal work in Linux, plus the installation of a 3rd party SSH/SFTP browser called Filezilla on your Mac
You’ll have to edit one file in all this, but it’s one line and it’s pretty easy.
NETATALK SHARES YOUR HOME DIRECTORY WITH MACOS.
Here’s how to do it:
First, on your Ubuntu desktop (I’m assuming Ubuntu for this. If it’s a derivatives of Ubuntu, such as Kubuntu with the KDE GUI, just start the Konsole terminal from the Launcher menu), ahem, PRESS THE CONTROL + ALT + T keys.
Up pops your Terminal
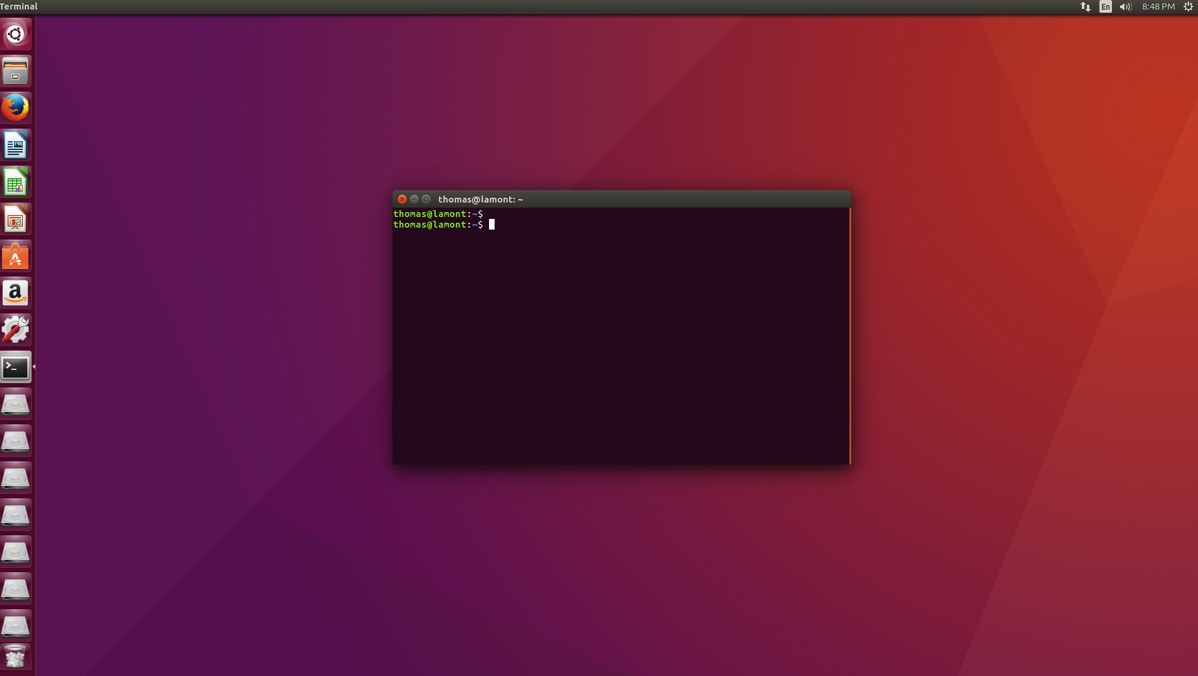
Enter this line into the Terminal. Copy and paste it if you want to:
sudo apt-get install netatalk

After entering that line, press the ENTER key
The terminal will ask you for your password. This may be the hardest part, because you have to type in your password with no visual feedback.

Nothing shows on screen to help you.
Now press the ENTER key. If you succeeded, the download and installation process will begin.
If not, well, try again and type slowly and mindfully. Then press the ENTER key.
Assuming you’ve succeeded, the download and installation of Netatalk begins. At some point, you’ll get asked whether to proceed. Just press the Y key and the ENTER key.

When it’s done, you’ll return to the Terminal prompt.
Now for the file editing. Type or copy and paste the following into the Terminal at the prompt:
sudo nano /etc/netatalk/atalkd.conf
Press the ENTER key. Enter your password if asked.
You now see the nano editing screen with atalkd.conf ready to edit.
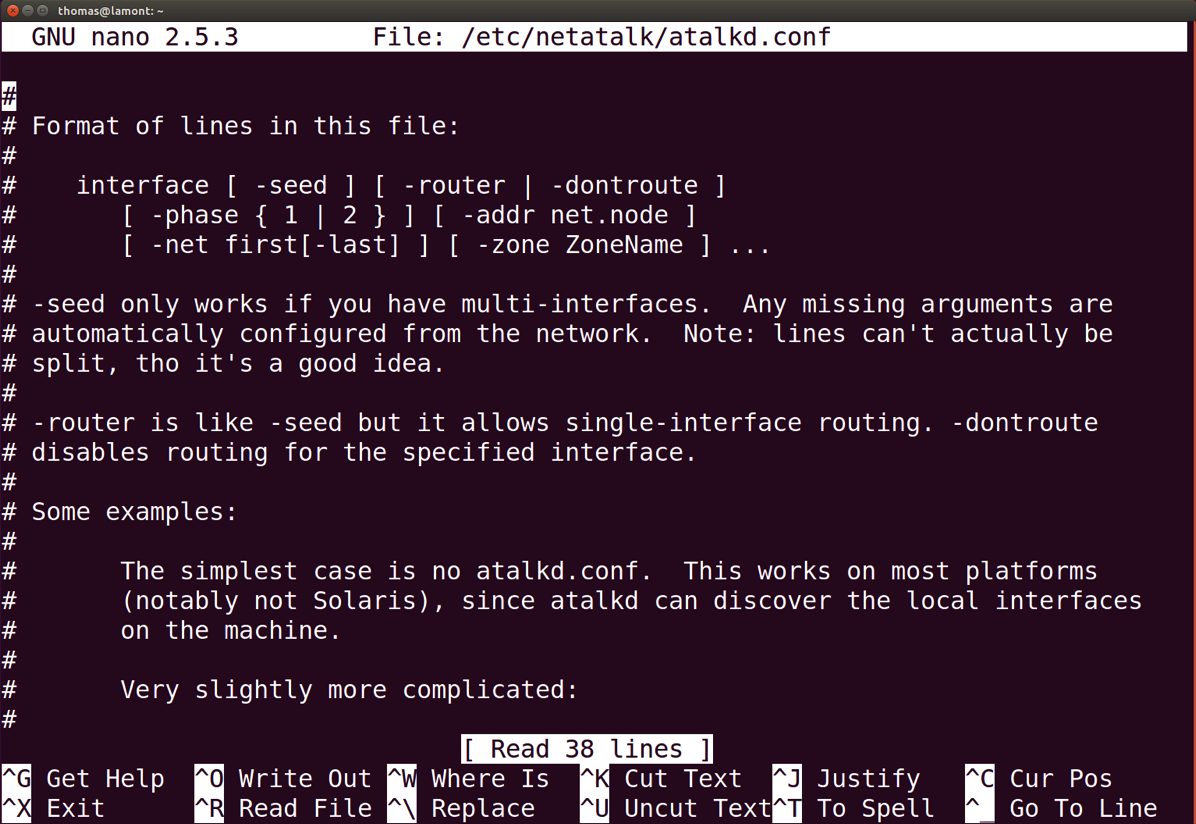
Scroll down to the very bottom of the file by pressing and holding the Down arrow.
At the bottom of the file add these four characters:
eth0
That’s an “e”, a “t”, an “h”, and a zero. Not the letter o.

To save, or write out, this modified file, press the Control key and the letter O.
You will get a highlighted message showing the file’s name and the file path or where’s it’s located in the file system.

Go ahead and press the ENTER key to save, or write out, the file to disk. You’ve saved 38 lines.

Now press the Control and X keys to exit the nano editor. You’ve returned to the terminal prompt.
Your work on the Ubuntu Linux machine is done for now. Move back to the Mac.
Open the Finder. Look at the Sidebar under Shared. You want a computer icon with the name of your Linux machine under it.
Don’t see it? Restart the Linux box. Give it a kick in the pants to get its attention.
Now you should see it. My shared directory is called Lamont, after Lamont Cranston, The Shadow. Super-hero of 1940’s radio. But I digress...


Anyway, that’s the quick way to set up a two-way network with Ubuntu as the server and your Mac as the client. Just treat the HOME directory as another Mac folder to drag files to and from.
If the reboot of the Ubuntu Linux machine didn’t work, check to make sure all the Ethernet cables are firmly in place. Pull them out and push them back in until you hear and feel a click.
Now you’ve shared your Linux HOME directory as an Apple Filing Protocol network drive. Until further notice, this works just fine. But read on for a warning about the future.
The future-proof way to network your Ubuntu Linux machine back to your Mac
This reverses the process I showed you in Part I, where you set up your Mac as an SSH/SFTP server and your Ubuntu Linux machine as the client.
Step One: Ubuntu Linux doesn’t come with an SSH/SFTP server installed. You have to install it. But it’s relatively simple.
Go back to the Ubuntu Linux machine and start the Terminal by pressing Control+Alt+ T or going under the Applications Menu for the Terminal.
What matters is that you start the Terminal.
Now to install the SSH server, known as OpenSSH, via the Terminal. You type, or copy and paste, this one line, into the Terminal:
sudo apt-get install ssh

Press the Enter key.
Enter your Linux password carefully and mindfully to ensure no errors. Press the ENTER key and the installation should begin.
Watch the text scroll down the screen and then return to the prompt.
How do I know I succeeded before I add any more software?
Well the Finder can’t work with SFTP and SSH connections, but your Terminal can.
So open the Terminal to enter this command:
ssh <Linux user name>@<Linux computer name or URL>

Press the ENTER key. Enter your Ubuntu Linux password carefully and mindfully to avoid mistakes.
Now you’ll get asked if you want to trust the Linux computer. If it’s sitting right next to you, of course you do. So type yes and press the ENTER key.
You will get a warning that you’ve made friends with this computer for better or worse now.
Finally enter the Linux password one more time. Now you’re sitting virtually in front of your Linux computer from your Mac. It’s quite possible you could do this with a Linux computer much farther away!
By the way, the URL refers to the Linux computer’s Internet address of xxx.xxx.x.x.
But CONGRATULATIONS! YOU’VE LOGGED INTO YOUR UBUNTU LINUX MACHINE FROM YOUR MAC USING SSH! WOO-HOO!
But I doubt that you want to enter a complicated command line just to copy or move a folder from your Linux compute to your Mac or the other way. No, you want a file manager that recognizes SSH and SFTP connections. And Finder just won’t cut it.
Now you may already own a suitable browser. Do you own the Forklift file manager or the Commander One Pro file manager? They’ll do it.
If not, go here to the Filezilla Web site to download the donationware Filezilla SSH/SFTP browser. it works with macOS 10.7 and up.
You will run an installer to set it up. Beware of bundled crapware. They are a non-profit and have to pay the bills somehow. So they agree to bundle software with it that you have the chance to forgo. So be careful. It’s not destructive malware, but you don’t need the Yahoo Search Engine replacing what you already use in your browser.
So start up the Filezilla browser. I’ll explain it to you.

You need to enter the connection information first.

The host is the Ubuntu Linux computer’s name or its Web address.
The username is your Linux user’s name.
Your password is your Linux password.
The port for SSH and SFTP connections is port 22.
The Quick Connect drop-down menu is for previous connections.
So enter in those four pieces of information and press the ENTER key. You should see Filezilla connect to your remote (even if it’s just sitting next to you) Linux machine in the dialog box below displaying status:

Below the status line on your left-hand side is the two panes showing your local directory. In my case, it’s my Music directory or folder.
On your right-hand side is your remote directories listing. Now it will show your visible and hidden files and folders, so you may want to scroll down until you reach the directories or folders that you recognize.
Now just drag and drop files between the two directories. It’s that simple.
That’s a brief lesson in how to use Filezilla. As I said, it’s donation-ware, so if you like it, give a few dollars to the cause.
You can find tutorials for more advanced aspects of Filezilla on the Web. Just search for them by typing in Filezilla Tutorial into your Web browser’s address bar.
Why I said this was a future-proof method of connecting your Mac and your Linux machine.
Apple plans to replace its creaky file system, HFS+, which they’ve used for 30 years, with the new and shiny Apple Filing System (APFS). They also plan to deprecate and eliminate the Apple Filing Protocol, which Netatalk currently depends on.
I would speculate that Netatalk, under very active development, will adjust to this change when bringing out new products. So don’t panic.
I will further speculate that Apple will NOT replace the SSH and SFTP protocols. So you’ll still have those to use when connecting your Mac to your Linux machine. So this article will remain valid for some time to come.
I don’t know about Apple’s plans for Apple Filing Systems, other than what I read at AppleInsider and Macworld.com. If you know more than I do, please tell us about it in the comments.
Now on to Part III, where I tell you about a simple way to network your computers using the Dukto file transfer program and the Synergy mouse and keyboard sharing program.
Tom Briant
Editor, MacValley Blog
Saturday, March 4, 2017
How to successfully network between macOS 10.12.3 and Ubuntu Linux 16.04 Part I from the Mac to Ubuntu Linux
If you have tried to network between a computer running Ubuntu 16.04 and a Mac running macOS 10.12.3, you’ve probably hit a wall.
You set up Windows style SMB networking in the Sharing preference pane by clicking on the File Sharing box in the Sharing Preference Pane
You can see an icon for your Mac in your Linux file manager for File Sharing.
You click on that icon and you get a request for your user name and password. Over and over and over.
So you thought, “Well, I’ll go the other way and activate file sharing on the Ubuntu machine to network back to the Mac.” You did all the steps and still hit a dialog box which told you that you entered the wrong password. Over and over again.
Urrgh! And I’m sure much worst language, as well.
Well, it’s not you. It’s not your computers. It’s the simple facf that the way SMB networking works on the Mac and the way it works on the Ubuntu Linux have changed. They have diverged and become INCOMPATIBLE. So it’s not going to work until you take radical action. And I don’t know what the heck that radical action would be.
Yes, I tried the SMBUp donationware program to replace Apple’s implementation of SMB with plain vanilla Samba. The installer downloaded, but the installation failed twice under macOS 10.12.3
Finally, I found an answer. This is the key phrase to remember:
Forget using SMB and switch to SSH and SFTP.
The implementations of SSH (Secure Shell) and SFTP (Secure File Transfer Protocol) to connect computers for both macOS and Ubuntu Linux are fully compatible.
Here’s how to do it between your Mac and your Linux machine:
Step One: On your Mac, pick the folders you wish to share. If you have folders within those folders that you want to share, too; that’s fine. Just pick the overall folder, like your Music or Documents or Pictures folder.
Now view these folders in your Finder. Right-click/control-click on each of them in turn. Click on Get Info.

Choose to share the folders. This will cause the File Sharing box in the Sharing Preference Pane to receive a check mark and turn it on. Do not turn off File Sharing, as you will need it later!

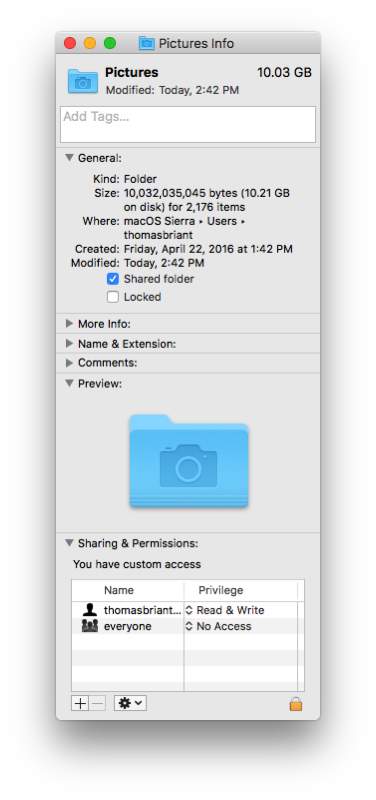
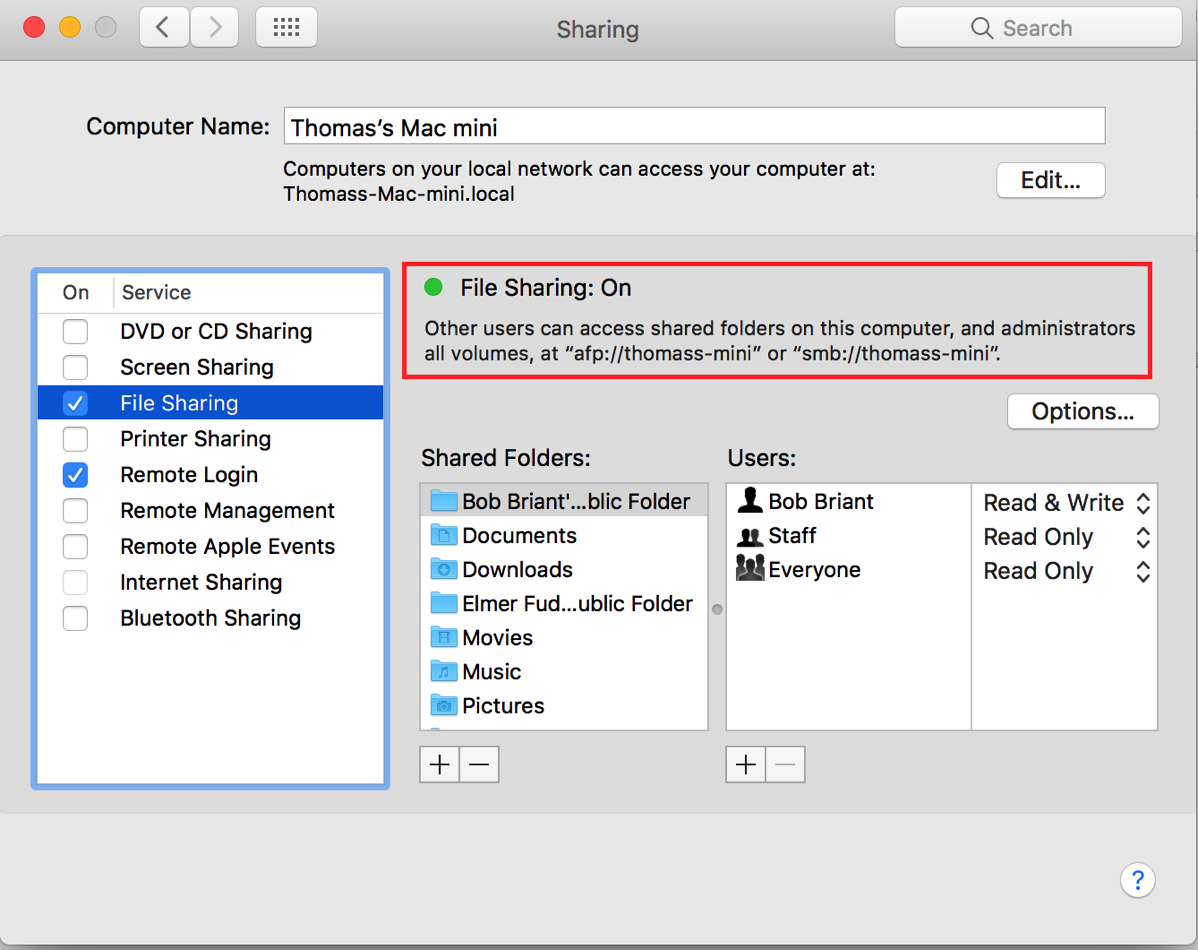
Step Two: Go back to the Sharing Preference Pane on your Mac. You want Remote Login. You will see a message telling you how to log back into your Mac from another computer using SSH.


You’ve set up your Mac. Now go over to the Ubuntu Linux machine.
Go to the File Manager.
In stock Ubuntu, the File Manager is called Nautilus. The icon for it looks like an open file cabinet. It’s in the upper left-hander corner. Click on it.
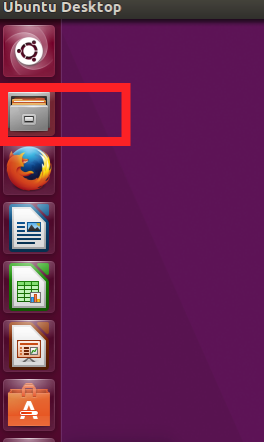
On the left-hand sidebar, go down until you see Network. Click on it. You should see an icon for the Mac. Indeed, you should see several icons for the Mac.

Click on Network to see al the computers hooked up to your Ubuntu machine. You should see several entries for your Mac. One is just the computer. Another two or three are for your Mac followed by parentheses (File Sharing).
The one you want to start with is your computer’s name followed by (Remote Login). Double-click on it.

You’ll get a warning that your Ubuntu machine doesn’t recognize your Mac and that you should really contact your System Administrator to make sure it’s OK>
As you are the System Administrator, double-click on the button “Login Anyway” Now you get a dialog box asking for your user name and password. Notice that it does not have the middle entry for Workgroup that previous boxes of this type showed when you used SMB File Sharing. This is a sign that you are on the right path.
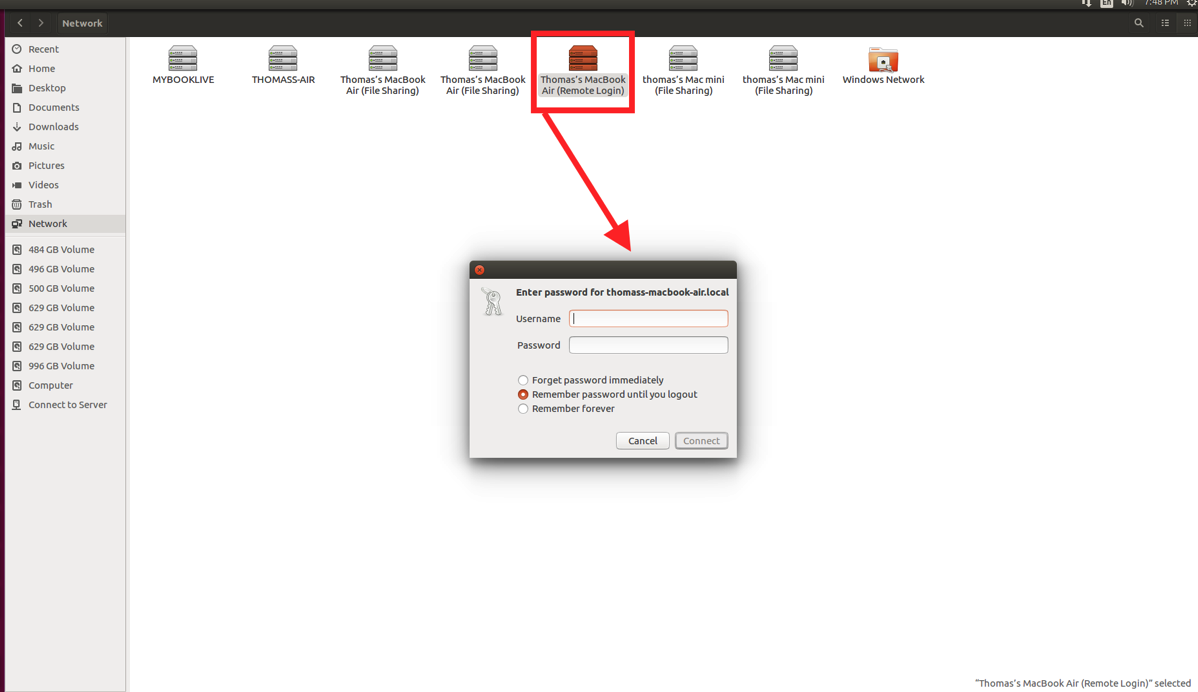
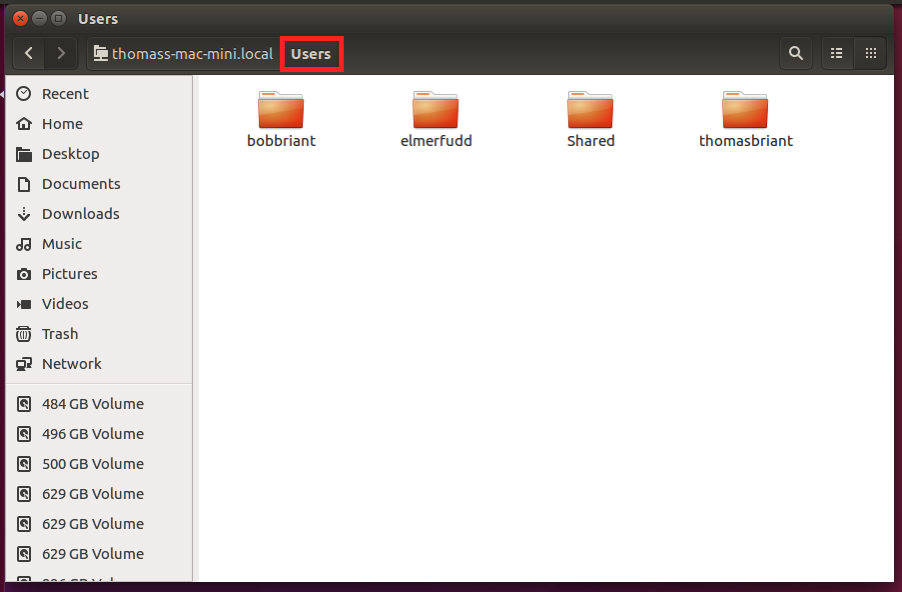
So enter your Mac user name and Mac administrative password and press ENTER. You should see a display of your Mac’s file system with all sorts of UNIX folders you don’t normally see. That’s OK, you’re looking at the root of the Mac’s file system. Just maneuver down to Users (not usr) and double-click.

Now you see the various user accounts you have set up. You can enter the folders that you set up as file sharing because you gave them the file permissions to share with the world.

Now for the File Sharing icons.
Click on them in succession. If you get a dialog box with User Name, Workgroup, and Password, that means you haven’t got the right one. Go on to the next one until you get a two line dialog box with just User Name and Administrative Password. This is the one you want.
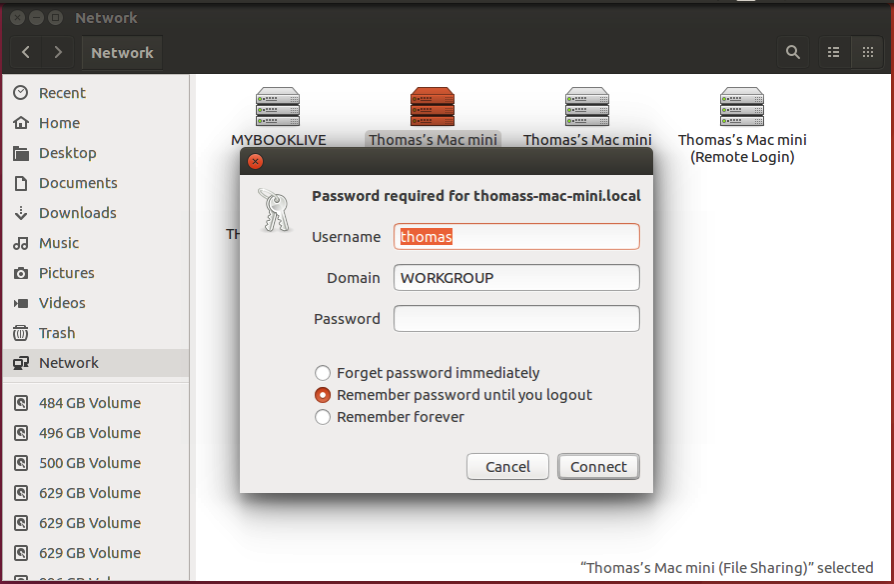

Enter your user name and administrative password, then click on OK. You should finally see the icons of the shared folders.

What went right this time?, you ask. Well, you will not use the SMB networking protocol. You will use AFP, Apple Filing Protocol, over Secure File Transfer Protocol. You set up Secure File Transfer Protocol when you set up the Remote Login. Now you will use Apple Filing Protocol.
Some Caveats.
Now SSH is designed to network two and only two computers securely. While it’s possible to network more than two computers using SSH, you’d need a server setup for that.
I’ll show you how to network between your Ubuntu Linux machine back to y our Mac using two methods in the second installment. Both work, but one takes less time.
I’ll show you a simple way to network two or more computers in the third installment. For right now, you’ve networked two computers, a Mac and a Linux machine, together securely.
I’ll get into the steps necessary to perform if you want to network a different Mac here.
The known hosts file that specifically identified your Mac as the server to log into is in a hidden folder called. “.ssh” You need to remove that folder and file before you can set up a different computer as the server. Note that all hidden files and folders are preceded by a dot.
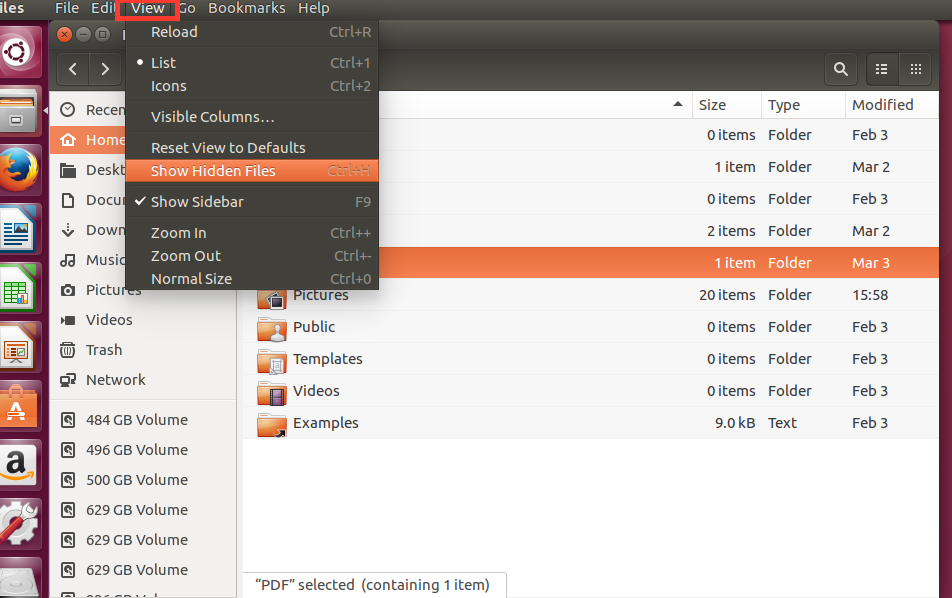
To do so, go under the View menu for the Files app, whose icon looks like an open file drawer at the top of the list of icons. Click on “Show Hidden Files” and a lot of hidden folder and files will appear in the HOME folder.
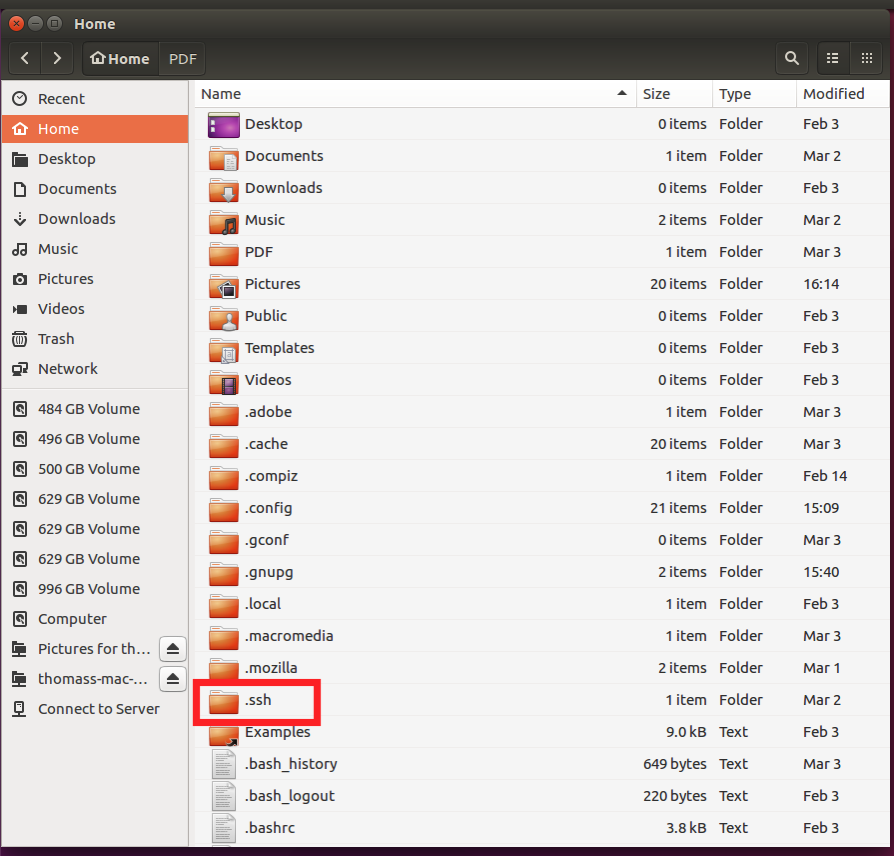
You right-click on .ssh and select Move to Trash. That’s it. Now you can use the new computer to log in.

Now go back through the steps I outlined above to set up a new Mac for file sharing.
Problem solved from Mac to Ubuntu.
Tom Briant
Editor, MacValley Blog
