


The MacValley blog

Welcome to the MacValley blog, your first stop for all the latest MacValley news and views.
|
The MacValley blog Editor: Tom Briant
|
|

Saturday, February 2, 2019
Did you backup your computer today?
Dear Friends:
Did you back up your computer lately?
Today in Southern California the weather is wet and blustery. Good day to stay inside, watch Netflix or read Agatha Christie novels.
But you must make sure you backed up your Mac!
If you don’t know how to back up your Mac using Time Machine, Apple has you covered here.
Tom Briant
Editor MacValley Blog


Saturday, January 19, 2019
How to Read and Write to a USB floppy drive through MacOS
I have found a way to access floppy drives in MacOS.
This technique uses readily available software and hardware.
It doesn’t involve the Terminal.
It doesn’t involve undocumented commands within MacOS that may go away with the next update.
I have tried this technique on both macOS 10.13.6 on a 2011 Mac mini and 10.14.2 on a 2014 MacBook Air.
Let’s proceed!
How He do it?
Parallels Desktop 14 and Ubuntu Linux 18.04 lie at the heart of this technique.
Ubuntu Linux 18.04 can access a floppy drive, unlike macOS and Windows 10.
Parallels Desktop 14.1 includes a simple way to install Ubuntu as a guest OS under macOS and can access both the host operating system’s User folder and the USB floppy drive.
Step #1:
Go to the Parallels website here to download a trial version. You can try it for 14 days before committing to buying it.
It comes as an installer. Double-click on it and follow the on-screen instructions.
Step #2:
Within Parallels Desktop, go to the File… menu and select New.

Step #3:
You will see a Create New screen offering several options.
You want the Download Ubuntu Linux, next to the orange dot with the white lines.

Step #4:
Click on the orange Ubuntu Linux circle to select it. You will see a light-blue square with rounded corners overlay it.
Now click on the blue Continue button at the lower right-hand corner.

Step #5:
You will see a screen briefly describing Ubuntu Linux and the company producing it, Canonical Ltd.
Click on the blue Download button in the lower right-hand corner

Step #6:
The download will start. How long it takes depends on the speed of your Internet connection. Wired connections will run faster than Wi-Fi.
This screenshot was taken with a computer on a wired Internet connection.

Step #7:
After the download of the compressed archive file finishes, it will take a moment to unarchive the file.

Step #8:
You enter your new password. You will type it again in the next step to confirm it’s the right password

Step #9:
Retype the password to confirm it’s the correct one.

Step #10:
Click on the Orange Parallels box. Parallels is your user name, assigned to you by Parallels Desktop’s auto installer.

Step #11:
Type in your password
Step #12: Success!
You’ve arrived at the Ubuntu Linux Desktop

Step #13: Attach the floppy drive.
If you haven’t plugged the floppy drive into a USB port, do so now.
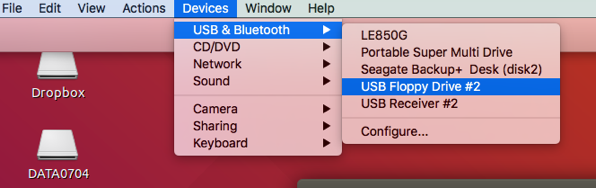
To connect the floppy drive to the Ubuntu Linux, you need to go up to the Devices Menu. This is part of Parallels Desktop itself.
Step #14: The Devices Menu
Now you see the Devices menu with its drop-down file item for USB & Bluetooth.
Click on the USB & Bluetooth item. You get the physically attached USB Floppy Drive.
Click on the item for the USB Floppy Drive to connect it to the Ubuntu Linux.
Step #15: The Floppy Disk Icon Appear on the Ubuntu Desktop
The Floppy Disk icon with the name of the floppy (in this case, it’s DATA0704) appears on screen.
You have to put in a real floppy to make the floppy drive work. You’ll get an error message if you don’t.
In case of error message, just stick in a floppy disk.

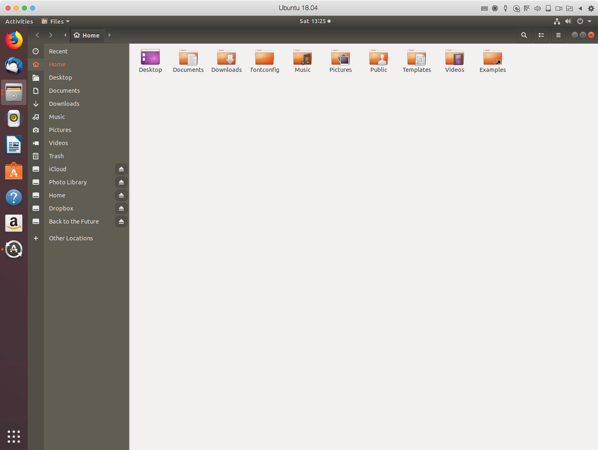
Step #16: Open the Home Folder.
A bit of explanation. For the MacOS, the User folder is where the user’s documents are stored.
In Linux, the Home folder is where the user’s documents are stored.
So here, If you click on the Parallels Shared Folders to see a folder named Home, it’s the MacOS Users folder.
Step #17: Apologies for Confusion.
Ideally, you should babysit this process from start to finish in case you need to intervene. It should take about an hour.
I tried this twice today on the same Mac mini. One time, no problems. The second time, I needed to shut down the whole Parallels Desktop software. After I restarted it a few minutes later, everything worked fine.
You should undertake this with a patient attitude. The installation of the Shared Folders can get a little hairy at times. You may see a box asking for your password. If so, you should enter it.
My conclusion after working with this is that this is the simplest method of gaining access to a floppy drive through a Macintosh running 10.13 or 10.14 without involving a second physical computer.
This Parallels Desktop software is worth the $79.99. I tried using the free VirtualBox 6.0 software from Oracle. I spent four unsuccessful hours trying to replicate what I did in less than an hour with Parallels. Spend the money! You’ll get what you paid for in this case. Your time is worth at least $20/hour. Remember that!
The command you’ll use most often is the “Control + Alt/Option” combo to free your cursor from Ubuntu Linux. Remember it, Control + Alt/Option.
Good Luck, be patient, and rejoice when this works.
Thomas Briant
Editor, MacValley Blog
thomasbriant@me.com
Tuesday, January 1, 2019
Start With Growly Journal for your new 2019 Journal
Did you vow to start a journal in 2019?
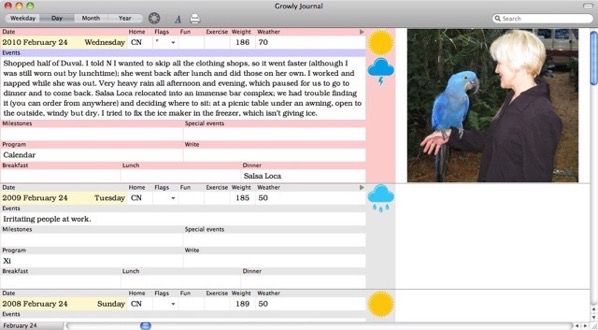
If you have the determination, but need an app to start with…may I suggest Growly Journal from Growly Bird Software?
Advantages:
1. It’s free
2. It gives you categories for entering data in case of brain freeze.
3. It exports to a per-entry plain text format.
Sure, you can get fancier apps and pay up to $40 for them. Why not start with Growly Journal?
Tom Briant
Editor, MacValley Blog
Saturday, December 29, 2018
Three End-Of Year Tips to make 2019 Easier
One, get a timer.
Whether you use the timer on your phone, a Website (https://onlineclock.net) or pick up one at the store, a timer can make life easier in 2019.
You need a timer to make sure you don’t play Fortnite while others fume in the laundry room over your taking the last good dryer.
You need a timer to time the food you’re cooking. Yes, stop going to fast-food joints and cook your own food this year.
For starters, go here to the most profane and hilarious cookbook I have ever read. Warren’s sister wrote this for him. Read it here or download it in several formats. Cook and laugh.
Two, how to make a simple template for your Mac’s documents you use over and over again.
This tip is not new. Apple has included this feature since way back in the Classic OS days. Yet people keep reinventing the wheel when they need a new document only varying slightly from many previous documents.
Here’s the deal:
Select a document you want to recycle in the Finder. Click on it once.

Right-click or control-click on the document to bring up the Information Panel.

Click to put a checkmark in the Stationary Pad checkbox.

Click in the Stationary Pad checkbox. You’ve created a simple template for future documents.

Now when you click on this document, you’ll get a duplicate of it opening in the application using this document.
You can use it for letters you send out with your name and address and contact information already in place.
You can use it for computer coding documents you use over and over again with only a change to one or two variables.
You can use this with pictures, too. Any document you want to edit on your Mac can use this technique.
Now many apps already come with their own template capability. You can include variables, such as using a mailing database to insert names and addresses from that list.
The time and date are other variables your app’s templates could insert that this simple Stationary Pad technique won’t do.
Having said that, you now possess a simple technique from Apple for making templates for simple apps such as Text-Edit and Preview.
Third, get a second display
Macs, at least since the start of the Intel era in 2006, have come with a second display port.
Make use of it for your profit and amusement.
You can use your big screen TV or an iPad as that second monitor. You can also buy a cheap used monitor.
For the big screen TV, you need an adaptor cable. You’ll need a cable that fits into the Mac’s second display port on one end and into your big TV’s second HDMI port on the other.
For the iPad with the Duet Display, you’ll need your iPad’s USB to the iPad’s connector. Recent iPads use the Lightning connector, which are easy to find and purchase.
If you use an older iPad, it came with a 30-pin to USB cable. You will have trouble finding these on the market, so check your junk drawers.
Now you can use a Wi-Fi connections between your iPad and your Mac. Avatron’s AirDisplay uses the Wi-Fi connection.
If you want to display video on your iPad, you’ll want the hardwired connection used by
I’ve used both. They take a little fiddling to make the connection between Mac and iPad.
You want to make it simple? Just get a second monitor, put it where it’s convenient and plug in the correct cable and adaptors.
Tip: If you want to buy a cheap monitor, go here to PCLiquidations. They have used LCD monitors. They may have some missing pixels or a scratch on the bezel, but you can save some dollars.
Come here to Monoprice for the right cables.
That’s my 3 tips for years end to make life better.
Happy New Year!
Tom Briant
Editor, MacValley Blog
Monday, December 10, 2018
How to Add a Windows-Style Start Menu to your Dock for FREE!
Many of us work on Windows computers elsewhere. I use one at work.
We grow used to the convenience of the Start Menu in the lower left-hand corner. It lists all the apps we need in one place.
What if you could put a Start Menu in your Dock? What if you could do it for free? Follow me then...
Step 1: Open up the Finder to the root (bottom) of your boot drive.

At the bottom or root level of my own hard drive, called High_Sierra, I have 5 folders.
- Applications
- Library
- Opt
- System
- Users
Step #2: Click on the Applications folder and drag it down to the right side of the Dock.

You ‘ll notice several folders on the right-hand side. In the middle of those folders, you’ll see an icon looking like a lock. That’s the icon of the first app in my Applications folder, 1Password.
Note the settings revealed when you right-click on the icon:
- Sort by Name
- Display as Stack
- View Content as Automatic

Now to change it to a list of apps with the branded Applications folder in the Dock, do the following:
- Sort by Name
- Display as Folder
- View content as List

Here’s how my Start Menu looks when I click on it:

Summary:
With this procedure, you get a Start Menu in your Dock. Other apps, some free and some paid, offer more options for the Start Menu.
For a free option, look into Devon Technologies’ XMenu, available here. You will need to scroll down the list of great freeware they provide to see X-Menu.
For a paid option, look into Brawer Software’s uBar 4. It’s about $30, but gives you a full-blown Start Menu on the left-hand side. It seemingly replaces the Dock.
Well, it shoves the Dock over to the right-side of the desktop and puts it on auto-hide.
Don’t steal it! The developer has a neat way of combatting piracy. The app’s text morphs into Klingon if you use a bad password.
Tom Briant
Editor, MacValley Blog
Tom's observations on the current state of the Mac market 2018
The Mac lineup now comes with lots of power from the Mac mini to the iMac Pro. It will cost you to buy a Mac.
Apple now focuses on professionals, what I call the “I can deduct this on my taxes!” market. If you want to buy a Mac or an iPhone, you’ll pay for it.
Some writers accuse Apple of “greed.” I won’t excuse them. They have touched the heights of a trillion dollars in stock market value. They won’t go back to a mere $100 million in valuation voluntarily. They value the cheers from Wall Street more than a good review in Macworld or MacFormat (UK).
My strategy is to use my Mac mini until it won’t run the software I need. This especially applies to the operating system. If the software you need won’t run on your current Mac’s operating system, then it’s time to start pricing replacements.
My first piece of advice for those seeking a new Mac is this: DON’T BUY OFF THE SHELF AT THE MAC STORE IN THE MALL! Go to Appleinsider.com and MacRumors.com, which list the latest deals. If you hold your enthusiasm in check, you can save substantial sums with mail order.
Just today, Fry’s Electronics listed the base model Mac mini at $747 instead of the MSRP of $799. Exercise some patience. You can find a good deal if you look for it.
Of course, Apple has us over the barrel when it comes to adding additional storage and memory. My sympathies. Just remember, you want to purchase a Mac for several years. I bought my Mac mini in 2012 with OS X 10.7. Now it’s nearly 7 years later with macOS 10.13. I’ve recouped my payment.
I’ll keep writing tips and techniques for getting more from a Mac. Your Mac has a lot of secrets hidden in the operating system. It’s my job to bring them to you.
Tip #1: Make backups with Time Machine if you run OS X 10.5 or above. Use Super-Duper if you run OS X 10.4 or below. That’s not original advice by any means. It will save you from the heartache of a dead hard drive/SSD and the loss of files you spent years creating or just saving.
Tip #2: Go back to Tip #1.
Haven’t got a back up drive? The following retail stores have them: Costco (near the big screen TVs), Best Buy, Frys, Staples, Office Depot, Office Max.
Want an even better deal? Head for Amazon and eBay and Newegg and Tiger Direct.
But Do It!
Tom Briant
Editor, MacValley Blog
Sunday, November 18, 2018
Holiday Tips for us
Hi MacValley Blog readers:
With the arrival of Halloween and a return to normal standard time (whatever that is), I should start passing out tips for the holidays.
Write down your Wi-Fi password and put it into your cell phone’s notes application right now. That way, you won’t get caught in your pajamas, or whatever you wear to bed, on some holiday morning frantically looking for the Wi-Fi router password!
Set up a separate table for the holiday food and drink. Do Not put a laptop on the same table as a mimosa, eggnog, or any other liquid. I recently tripped over a cord, spilled a drink and shorted out the display in a laptop. So, learn from my mistake!
Get a supply of those moist towelettes to wipe up spills. Get a can of compressed air to blow off the dust.
If you have the time, spend some time cleaning up your computer desk. I can tell you it’s probably gross looking.
Don’t use Windex or any other glass cleaning product to clean an LCD screen. This applies to your big screen TV or a laptop or tablet. No, no, no! Get an LCD cleaning kit. They’re in the checkout lane at Frys, Best Buy and at Costco in the jumbo pack.
What can you get for someone who’s obsessed with any sort of computers?
A good set of headphones, because you probably don’t want to hear the noise from a video game or YouTube video on any given holiday morning. I recently ordered a set of Sony MDR-7506 headphones from Amazon and I love them.
An extra monitor in case the laptop’s display goes out. You want one or more of the following connections: (1) VGA, which is compatible with computers going back to the early 1990s; (2) HDMI, which means you can plug a video game console into it; (3) Displayport, which works with many current computers.
No, you don’t need to buy the 34” curved 4K gaming monitor. I’m assuming the display goes blank when they start writing their term papers at 3:00 AM the morning before they are due. A 23” 1920 x1080 display for $120 is fine.
An extra wired Windows keyboard and mouse. At some point, your computer nerd will need an extra keyboard and mouse at an inconvenient time. They’ll remember you fondly if you gave them a box with a spare set of them. Don’t go super-fancy, Amazon Basic is fine for these emergencies.
If your video gamer tells you they’d really like a $800-dollar video card, tell them that Starbucks is always hiring. Nothing like some impetus to get them out of the house!
A Brother P-Touch labeler. Lots of stuff that looks the same and needs labelling. A God-send! (And don’t forget extra batteries!)
A pack of Post-it/Sticky notes. Get these at Costco or Staples or Office Depot for each member of the family.
A blister pack of Sharpie pens. You need these to label CDs and DVDs that they create in their computers. If they don’t know what CDs and DVDs are, you can use these with the Sticky notes.
Cans of compressed air. Always handy for cleaning stuff out of those hard to reach corners.
If it’s Christmas morning and you can’t think of anything, just go get an Amazon gift card for them at the nearest store. They can buy digital music, computer mice, and a Star-Wars themed coffee pot.
Stuff not to buy for the holidays:
No Tape cassettes. If they own a cassette tape recorder, as I do, they already have the cassettes.
No Floppy disks in any size. They are too destructible. Buy a 5-pack of USB flash drives instead.
No Holiday music in any form. Let them get this on their own! It’ll go on sale after the holidays. Unless you’ve got the original manuscript of White Christmas autographed by Irving Berlin, holiday music has come out of every musical orifice imaginable.
What are my holiday plans?
I plan to read David Sedaris’s Holidays on Ice while drinking Margaritas and listening to Chopin. As far as I know, Chopin never wrote any holiday music or drank any margaritas
As for margaritas at 8:00 am, well, it’s got to be raining somewhere!
If you don’t want to read David’s recollections of working as an elf at Macy’s, read A Christmas Carol or watch A Charlie Brown Christmas. Or read the Christmas source code and open a New Testament.
As for that statement about “Christmas source code,” no, I don’t include any rants against gay people, women, people of other faiths, and people seeking shelter from oppression added waaay after the Gospels. I mean peace and good will toward ALL. Sit down and have a piece of the holiday goodies. Yes, the muffins are gluten-free! And we have eggnog made with rice milk over there in the crockpot.
Now off to the sales!
Tom Briant
Editor, MacValley Blog
