


The MacValley blog

Welcome to the MacValley blog, your first stop for all the latest MacValley news and views.
|
The MacValley blog Editor: Tom Briant
|
|

Sunday, July 9, 2017
Forked-Daapd rides again! Preparing the USB External hard drive for installation of Linux Mint
Now that you’ve read the three previous blog posts in this series, you should have a USB installer in hand with Linux Mint on it.
But which version of Linux Mint do you use? Linux Mint has 4 different user interfaces:
1. XFCE, which I will use to demonstrate. The XFCE desktop is a low impact desktop, placing the lightest burden on your computer’s resources.
2. Cinnamon, which Linux Mint developed.
3. MATE, which continues the classic GNOME 2 interface.
4. KDE, which places the heaviest burden of these 4 on your computer’s resources. It is definitely a deluxe interface.
Which should you use? You can try each of them in a live environment from the USB installers you create. Just try them out. You’ll need to remember to save any documents you create to an external hard drive or flash drive before you turn off the live environment.
Apart from that, have at it. I will go into how convenient a live Linux environment can be for troubleshooting purposes at a later time.
Now to the installation of Linux Mint XFCE 18.2 “Sonya” on your external hard drive that you purchased for the occasion.
Step #4: Installation of Linux Mint on an external hard drive!
Start from a Windows 10 computer that you have turned off.
Plug in the Linux Mint installer. But DO NOT plug in the external USB hard drive yet.
Turn on the Windows 10 computer.
As you see the message briefly appear on your screen which key is the Boot Menu key, press that key.
You will enter the Boot Menu screen. Use the arrow keys to select between:
1. CD/DVD drive
2. USB drive
3. The internal hard drive that Windows 10 boots from.
Now press the ENTER key to make your selection. You should see your Linux Mint desktop appear shortly.
NOTE: If you do not boot up to Linux Mint after going through the Boot Menu screen and just go back to Windows 10, you should move the USB drive to another USB port.
USB ports can be picky at times and you have to switch USB devices between different ports for the desired results.
Now that you have reached the Linux Mint desktop, take a look around. Yes, it has a Start Menu, but the selections are different.
In particular, look under the System category for an app called GParted. You will need that in a moment.
Now you can plug in the external USB hard drive. It will take a moment for Linux Mint to recognize it and mount it.
Step #5: Partitioning and Formatting the External USB drive for Linux Mint
Now a few words of caution here. The Installation app in the live environment is designed to take care of partitioning and formatting the hard drive you will use.
It works great if you just have one hard drive and already have Windows on that hard drive. Then it will partition the disk into a Windows part and a Linux part, reformat the Linux part and go ahead to install Linux.
What I found to my dismay is that the Installation app falls short when you try to install Linux on a second hard drive separate from the Windows hard drive. I got all sorts of errors and started getting irritated. This isn’t supposed to happen!
Then I I checked to see if the stand-alone partitioning and formatting app GParted (GNOME Partition Editor) came with the live environment. To my delight, it did.
So I will walk you through using it for part of the installation.
Using GParted to partition and format the external USB hard drive.
Now that you have an live environment desktop, plug in the USB External drive. For the purposes of this exercise, I will presume that you just unwrapped a brand new USB external drive formatted as NTFS, which is the Windows 10 disk file system.
Go down to the Start menu and click on it. You want to enter the System category, filled with system utilities such as GParted. Note that the System category on the Start Menu has icon that looks just like the macOS System Preferences icon.
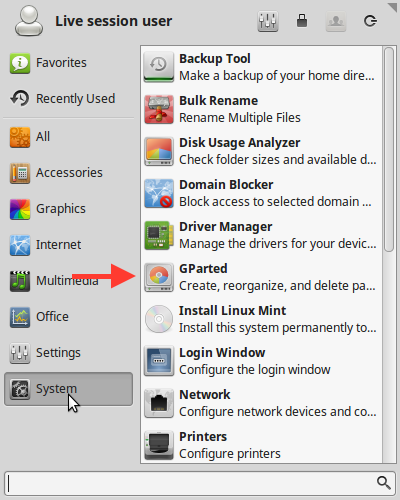
Double-click on GParted to start it up. I’ll guide you through the screens.
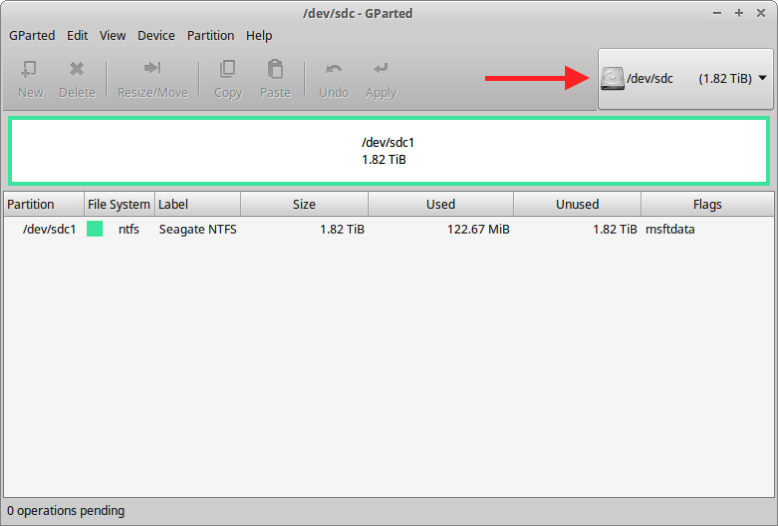
I want you to look at the area the arrow points to first. That area shows you which hard drive you are working on. In this case, I have selected the Seagate NTFS, the brand-new external hard drive that you just purchased. Linux refers to it as “sdc” That means it is the third device Linux is working with. The Windows 10 hard drive is sda and the USB flash drive installer is sdb.
A,B,C. 1,2,3. Take some time to wrap your head about the Linux system of referring to hard drives if you need to.
Now to GParted. It sets up a series of operations to perform. When you feel satisfied about the sequence, you will click on the Apply icon, which is a an arrow bending down and to the left.
Back to work. First off, you will remove the Windows 10 NTFS partitioning from the hard drive.
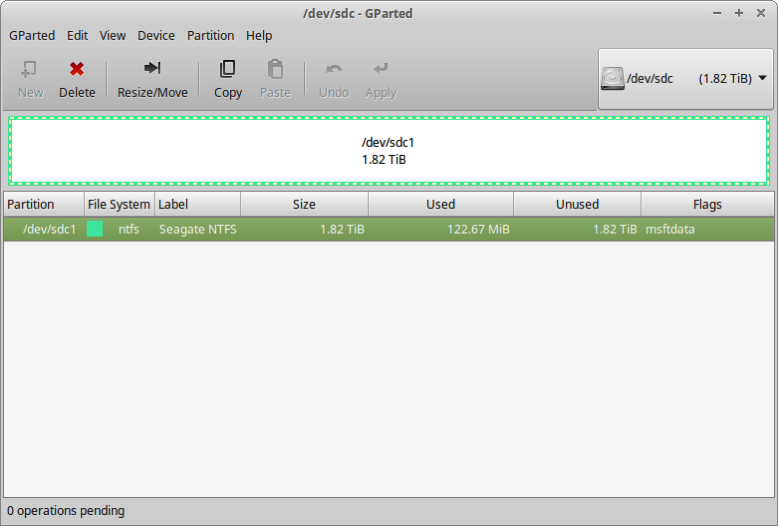
First, you must select the partition you want to work on. Single-click on the partition you want to work, which looks like a rectangle. When you click on it, you will see a dotted green line surrounding it. The text line below describing it will become highlighted. Most important, the Red X icon for Delete will turn on. You’re ready to do your first operation.

You’ve clicked on the Red X icon, which deleted the NTFS partition. Note that the Apply and Undo arrows at the far right of the menu bar have turned on, indicating you could use them. But not just yet! You’ve got two more partitions to go.

You will now create what is called the Linux Swap partition at the beginning of the hard drive, on the far left hand side. So type the following the boxes
Free space preceding (MiB) Leave that alone, GParted will fill that in for you.
New Size (Mib) Type in 10000 You want to enter 10,000 without the comma separator.
Free space following (Mib). Leave that alone, GParated will fill that in for you.
Align to: Leave that alone, GParted will fill that in for you.
Create as: Leave that as Primary Partition. Do not change.
Partition name I entered SWAP, this is optional
File System: Click on the downward facing arrow at the right of the box and select linux-swap
Label I entered Linux Swap, but this is optional.
Now click on the Add button. This adds the creation of this partition to the list of operations GParted will perform at the end.

Now it is time to create the main Linux partition Click on the large empty area to the right of the Linux Swap partition you created. Now click on New, the icon at the far left hand of the menu bar.
You will see this window appear. You only need to make sure its file system is the Linux ext4 file system, not the Windows ntfs file system!
Click on the Add button in the lower right-hand corner of the window.
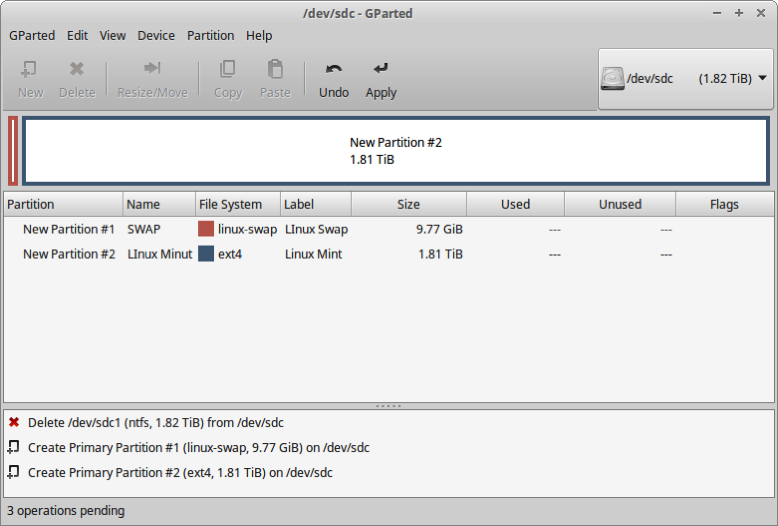
You want to make sure your GParted window resembles this window.
A new partition for the Swap partition, which is used in case you run out of RAM memory. It only needs to be twice the size of your RAM memory. 10 GB is fine
A new partition for the Main partition, which is where all the action takes place.
Now make sure the Operations window, the list of things to do with the external hard drive, does what you want it to do.
You’re ready? Now hit the Apply icon above.

A final warning from GParted before you commit to the changes. Check everything one more time. If satisfied, click on the Apply button in the Warning box.
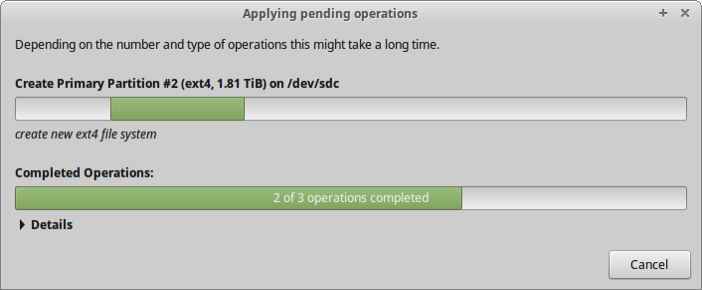
You’ll see this window appear as GParted prepares your hard drive. Just watch it until it finishes.
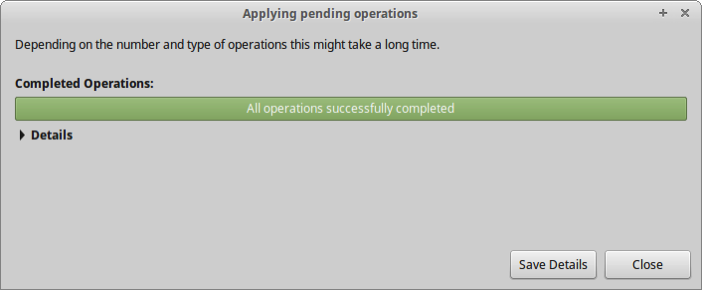
All operations successfully completed! Your external hard drive is ready for installation. Go to the next article for the details on how to install Linux Mint XFCE on an external hard drive.
Tom Briant
Editor, MacValley Blog


Saturday, July 8, 2017
Forked-Daapd rides again! Creating the Linux installer
Now that I’ve shown you what to do if things get sticky and how to solve them with the Windows 10 Recovery Drive, it’s time to remember that I’m writing about setting Linux and the forked-daapd iTunes server.
First, you need to download an .iso of the Linux version, or distro, that you want to use. If you’ve never touched Linux before, I will recommend LinuxMint to you. I have found it reliable, easily upgradable as upgrades come out, and it’s free. You can and should donate after you install it, but the software won’t bug you every 5 minutes for a handout.
How to install Linux and it’s not from a Windows installer or macOS .pkg.
You need to download an image file in an .iso file. Now you install an .iso file on a flash drive through the use of an installer program such as Etcher, Rufus, or Unetbootin.
Now Ubuntu Linux (from which Linux Mint derives) recommends the use of the Rufus installation app for Windows and the Unetbootin app for macOS. But I prefer Etcher. It has consistently given me the best performance. It comes in versions for Windows, macOS, and Linux. So I will show you all about Etcher.
Where do I download Etcher from?
You download Etcher from Etcher.io For Windows it comes as a installer that you run.
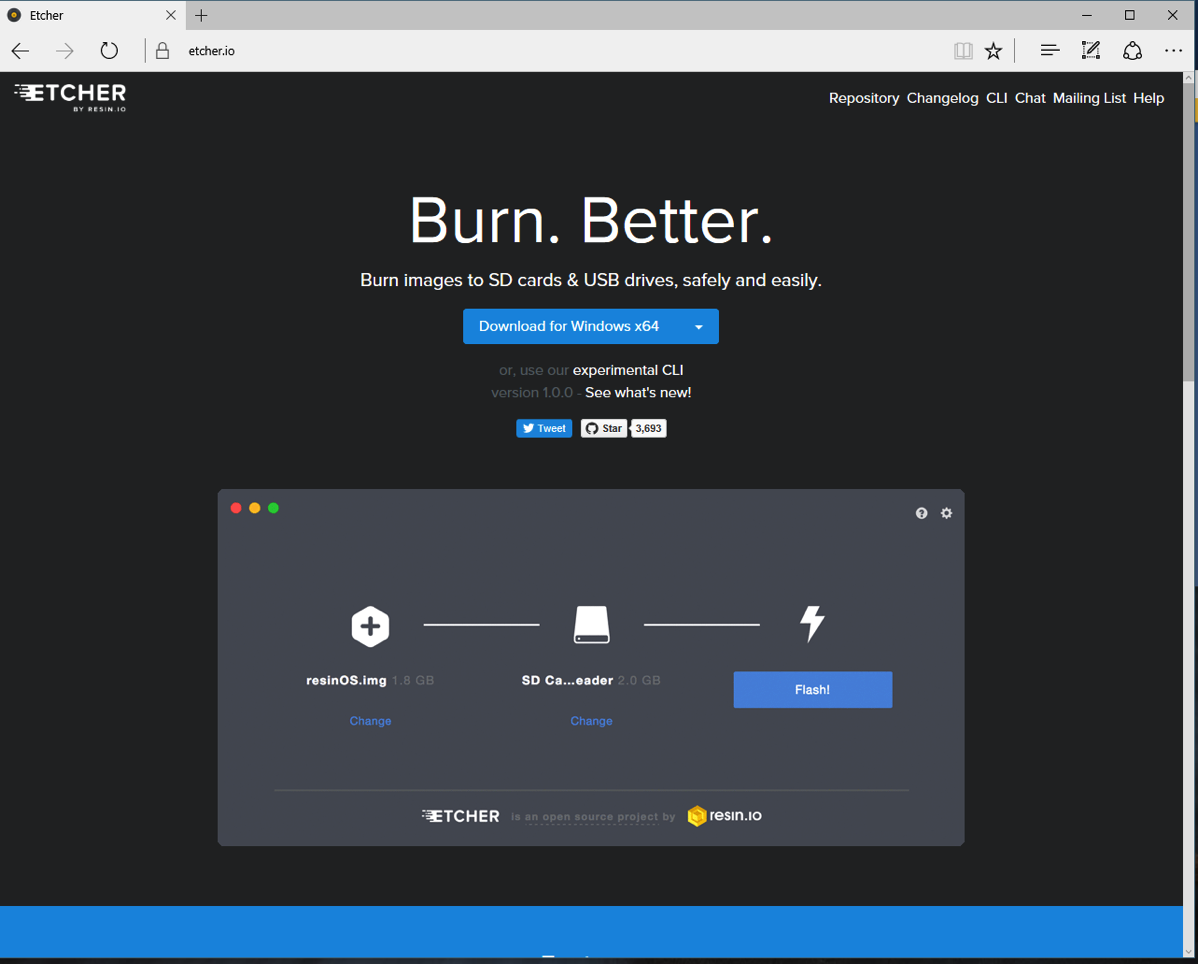
The Web site comes up for the version of Etcher that your current computer supports. If you want to download it for a different OS, click on the downward facing arrow to the right of the “Download for Windows x64” in this case.

You’ll find the Etcher download in your Windows \Downloads folder

Double-click on it to start the installation of the actual app

Click on Install to proceed

And you’re done. Click on Finish.

Etcher adds an icon to your desktop. Double-Click on it and you should see this screen shortly.
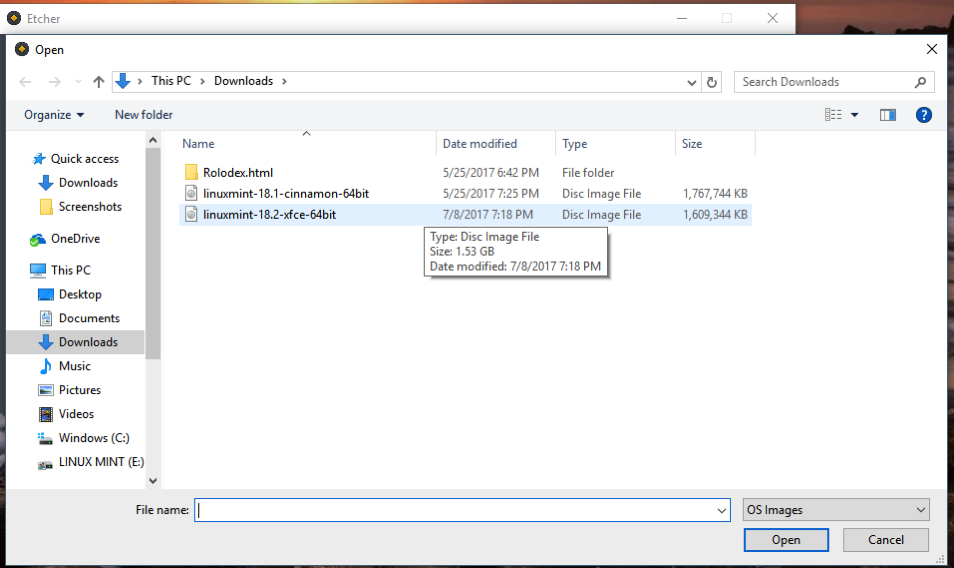
Click on Select Image and up comes a Windows selector box. Maneuver to your \Downloads folder, click on the desired file and finally click Open.

You’ve plugged in a flash drive and you are ready to flash the flash drive with Linux!

The process starts...

On its way...

Now Etcher will validate your drive so that it will boot up.

You’re done! Exit Etcher. Stand by for instructions in the next article on how to install Linux Mint on an external USB hard drive.
Tom Briant
Editor, MacValley Blog
Forked-Daapd rides again! How to Unbork your Windows 10 computer and get it back to booting up Windows 10
Forked-daapd rides again! How to turn a Windows 10 computer into a Linux music server and how to turn it back into a Windows 10 computer.
You wanted to know how to restore your dual-boot Windows 10 and Linux computer back into just a Windows 10 computer.
I will send you over to NeoSmart.net, who have dealt with this situation for some time. I have purchased and used their products to recover a Windows 10 installation. I found spending the money absolutely worth it. They know what they are doing.
So I am referring you back to NeoSmart for a list of instructions on how to unbork your computer, whether it’s an old Windows XP model or the latest Windows 10 and all points in between. Bookmark this for future reference.
Step #2: Unborking a Windows computer so that you can boot it up again after fiddling with it.
Go here to NeoSmart’s knowledgebase for the necessary information. Print it out if necessary. It’s relatively simple, if you have a Windows 10 DVD/USB installation media, an up to date Recovery Drive that I explained how to make it in the previous article, or one of NeoSmart’s Recovery products.
Do Not Proceed Further until you have read NeoSmart’s article.
Now, here are the steps to unborking your Windows 10 computer.
Take the Windows 10 Recovery Drive that you made in the previous article and plug it into the inoperable Windows 10 machine. You should make sure the Windows 10 machines is Turned OFF.
Now wait for the computer’s startup screen to come up. When you see the Boot Menu key, press and hold it lightly. Don’t mash the key, this isn’t “Whack A Mole”. Just lightly hold it down.

You’ll see the Windows 10 emblem appear and the rotating circle of dots. Then you’ll see the next screen.
It asks you to pick your keyboard layout. I picked US and went on.
Next you see a screen with three tiles on it. You want Troubleshoot.
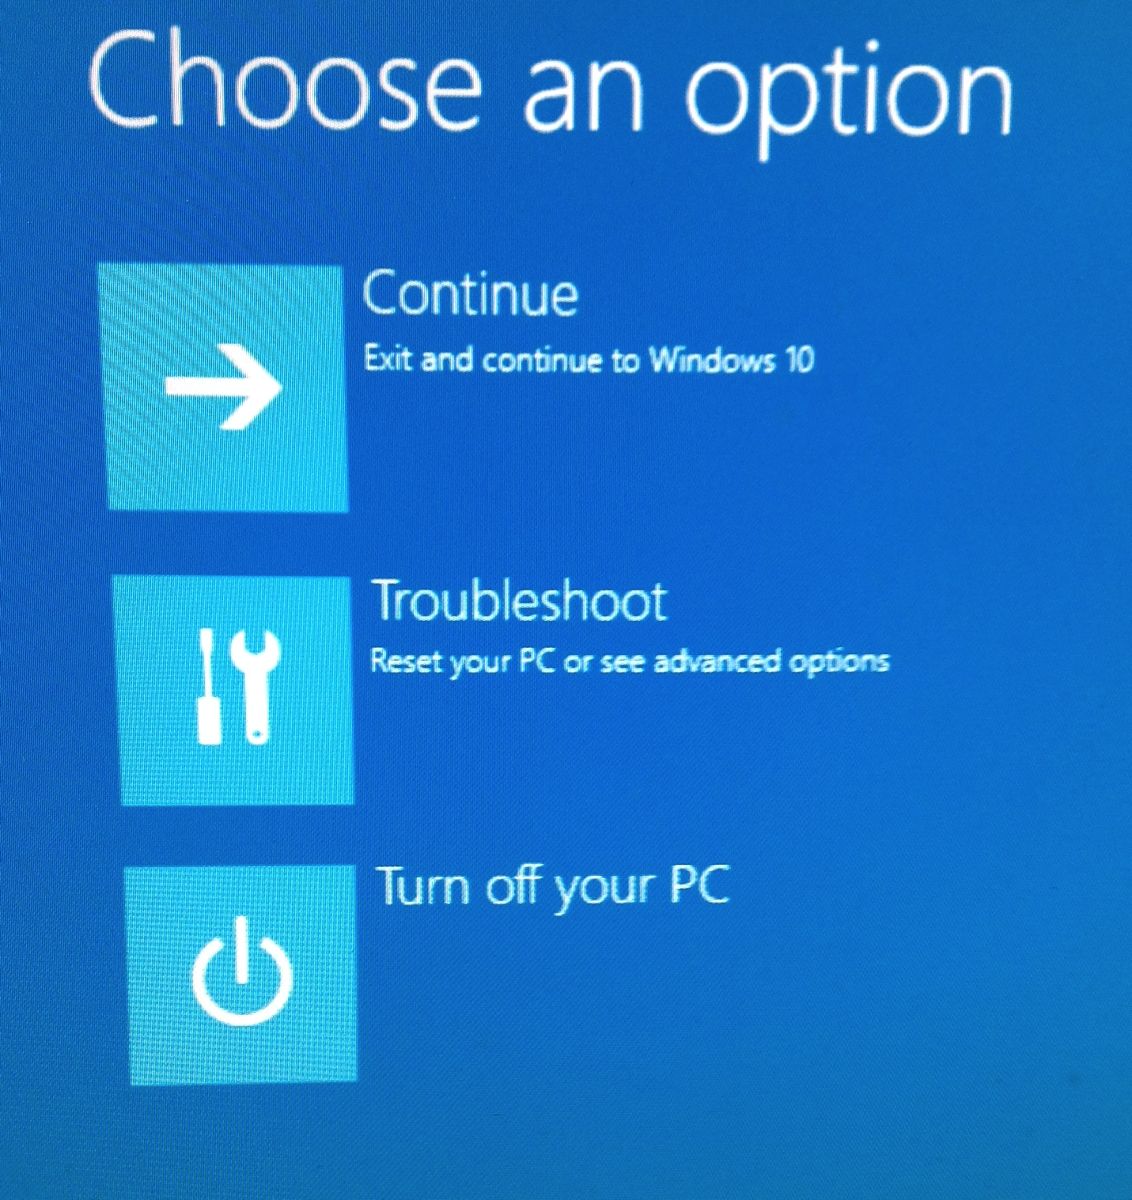
Now under Troubleshoot, you want Advanced Options
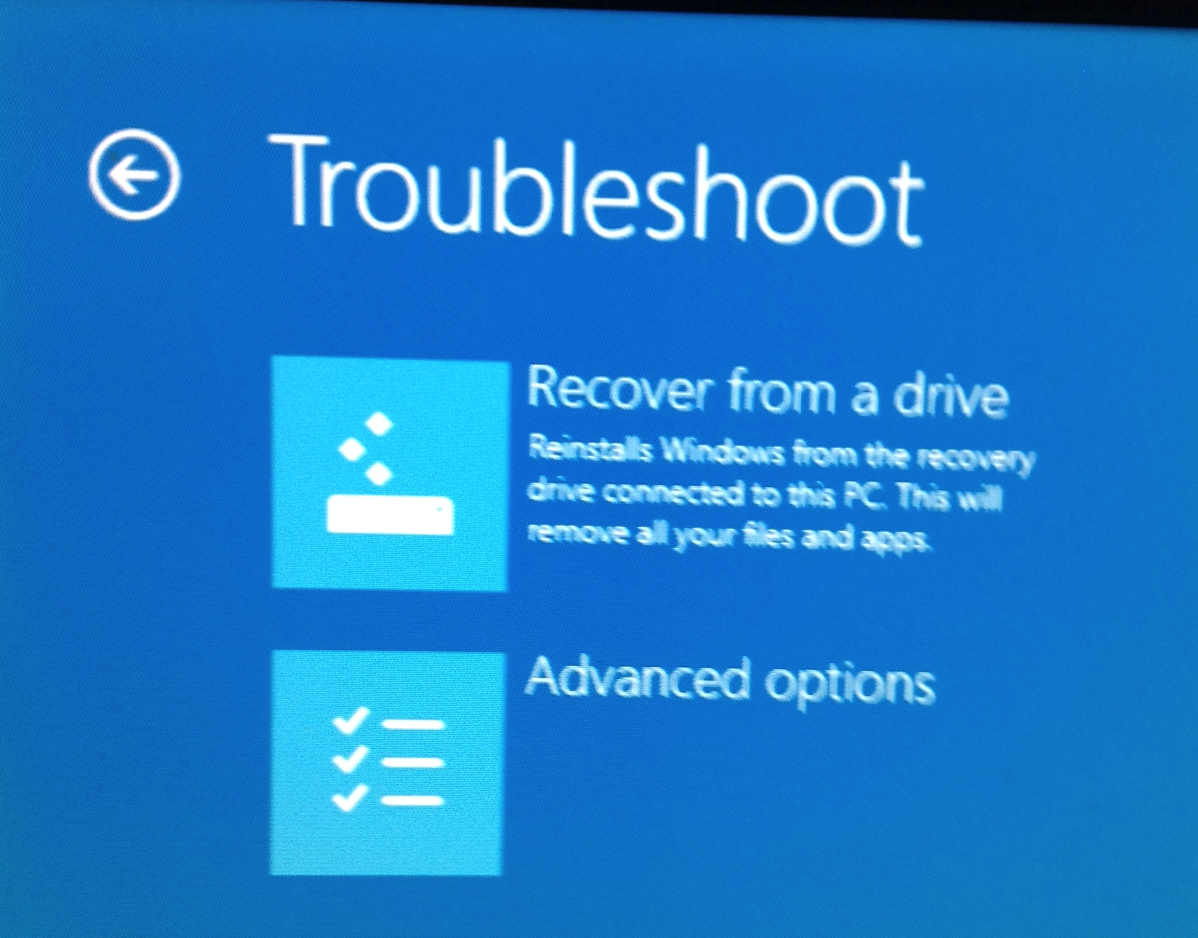
And under Advanced Options, you want the Command Prompt. We’re going in deep here.
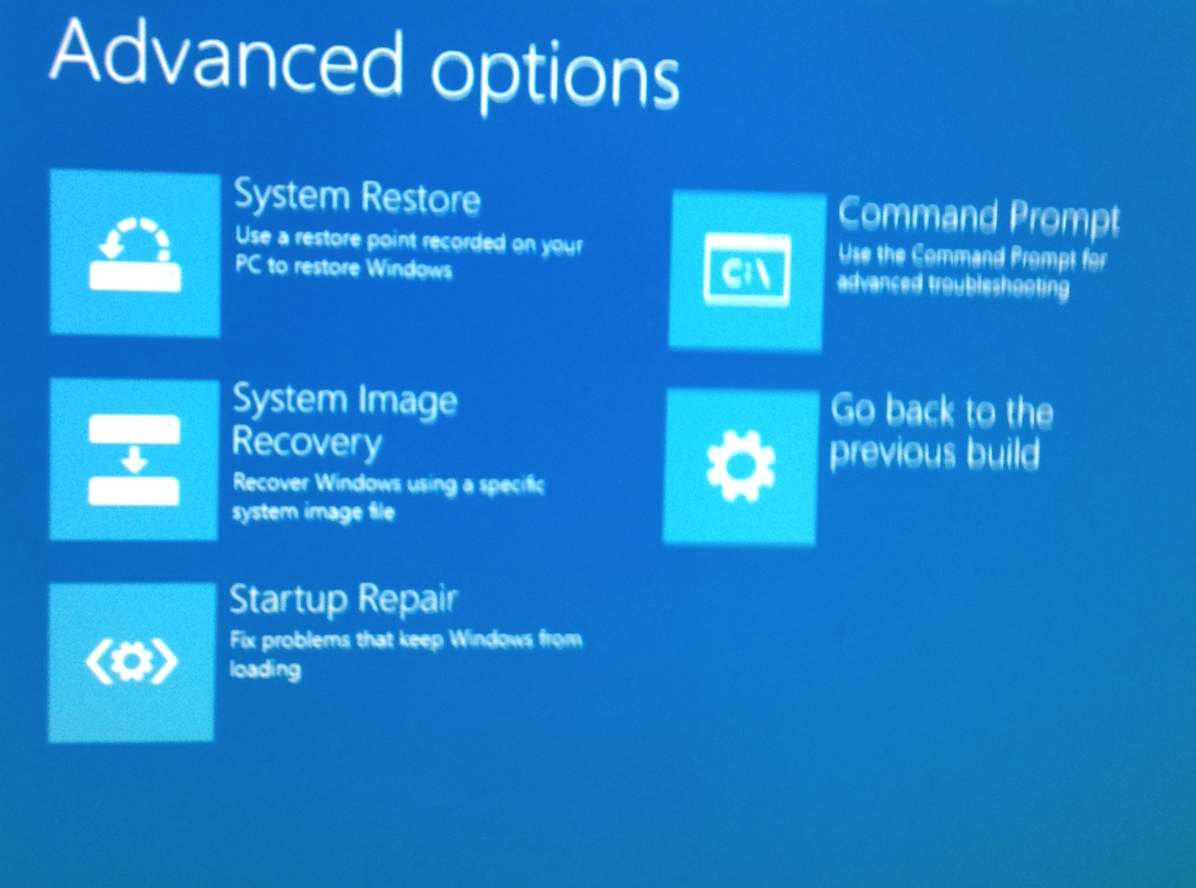
At the Command prompt, you want to type in these four commands and press ENTER after each one.
Bootrec /FixMBR
Bootrec /Fixboot
Bootrec /ScanOS
Bootrec /rebuildBCD
This screen shows a successful completion of the four steps.

Now click on the leftward arrow in the upper left-hand corner of the screen until you reach the first screen. Click on Turn Off your PC.
After the computer shuts down, remove the drive from the USB port and put it back into its container. You don’t want to lose it.
Now restart your computer. If all went well, your computer will boot up to Windows 10. You’re back in business.
Now if you can’t seem to boot up from the USB drive on the first try, move the drive to another USB port. USB ports can be picky. I don’t know why, you just have to move the USB drive to another port to make it work.
And again, thank you, Neosmart!
Tom Briant
Editor, MacValley Blog
Forked-Daapd rides again! This time sharing Linux with Windows 10
Hello Again! I haven’t written about forked-daapd in 2 1/2 years. So I thought I should write about it again.
My first articles and the original article published on-line at MacLife.com in 2009 presumed that you could lay.your hands on a discarded Windows XP desktop, preferably a mini-tower so that you could easily add additional 3.5” drives to it.
In the years since then, I have encountered many people buying Windows 10 machines. Except for yours truly, everyone has bought Windows 10 notebooks. Even I don’t want to crack open a tightly assembled and often glued together Windows 10 laptop.
So the next few articles in this blog will cover how to prepare your Windows 10 notebook for use as a Linux-based iTunes music server running from an external USB hard drive.
Most important, I want to cover what to do if you want to take Linux from the machine and just have it run Windows 10 exclusively.
Step #1-Creating a Windows 10 recovery drive
Now this project will not take place in one harried afternoon. I know you have schedules to keep and pets to feed and kids to see off to summer school. I will break this project into pieces to accomplish between your regular tasks. You can start this project before you turn in or before you head off to work or school or shopping
First, you need to make a Windows 10 recovery drive on a USB flash drive. If your notebook uses an earlier version of Windows, I’ll link to instructions for those computers at the end of this article.
Now you will need then following ingredients:
1. A 16 or 32 Gb flash drive. It can be either USB 2.0 or 3.0. Don’t use a 64 Gb or 128 Mb drive, 16 or 32 Gb is just right.
2. A small container, such as a used medicine bottle
3. A labeler such as a Brother P-Touch. Very handy for any household
Now to the drive’s creation. Boot up your computer and type the following sentence Create a recovery drive into the Cortana window at the lower left-hand corner of the screen
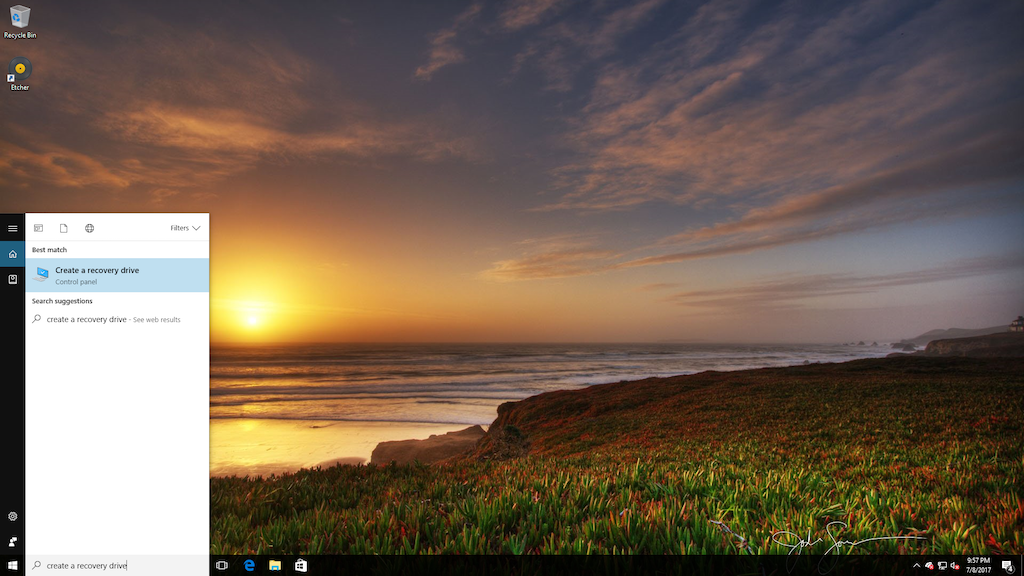
That’s it. Now double-click on the highlighted app for “Create a Recovery Drive”.
If all goes well, the app will slowly and steadily create your recovery drive. Here are the steps.

Since you acquired a 16 to 32 Gb (and no bigger!) flash drive, you can use it to reinstall Windows if necessary. So click on the box marked “Back up system files to the recovery drive.
Now click on the Next box in the lower right-hand corner of the app’s windows.
Now the app has to identify the flash drive you want to use. So please wait for a moment.

The app has found a flash drive plugged in. Click on it to highlight it. Now click on the Next button in the lower right-hand corner of the app.
The process begins...

And continues...

AT LAST! IT’S READY!
Now shut down your Windows 10 computer BEFORE yanking out the USB Recovery Drive! Just yanking it out before Windows 10 shuts down could ruin the drive that took all day to build.
Now for the labeler and pill bottle or jam jar!
Print out the label with a easily rememberable label. Windows 10 Recovery Drive 7-8-2017 is a good name for today. Now put it somewhere you can reach it easily in disaster strikes. I’ll go into how to use it in the next article.


One more thing! This drive is just for the computer you made it on. You can’t share it with other Windows 10 computers. And you need to run the Recovery Drive process to keep up with the Windows 10 updates. Do this once a month.
Now NeoSmart.net makes commercial software that you can share with other computers. Prepare to spend $40 on it, though. And it’s worth every penny, says this satisfied user.
Endnotes:
How to Fix the MBR (Master Boot Record) from Windows XP through Windows 10 You need to read this article before going any further. Thank you, NeoSmart!
How to make a Windows 10 Recovery Drive This is from Microsoft.
Tom Briant
Editor,MacValley Blog
Thursday, July 6, 2017
Senior Correspondent Arnold Woodworth's Weekly Web Wrap-up for Wednesday 7-5-2017
The debate is raging as to whether it's a masterpiece or a monstrosity.
Unlike the iPhone, the iPad hasn't launched whole new classes of services. And the more Apple does to make iPads competitive with laptops, the more it gets compared to them and comes up short.
But I also recognize that I’m far from typical of the mass market. While I wouldn’t personally make the switch, I have recommended to multiple friends that they do so, based on listening to what they want from a computer and what they want to do with it.
The concept is called "future-proofing." Basically, I buy a device that's way more powerful than necessary for my current needs in anticipation for the future when operating systems and apps will require more horsepower.
Future proofing can help you save money, but it can also keep you living in the past
The Bad Having only USB-C ports can be a hassle. The super-flat keyboard is an acquired taste.
The Bottom Line Even if you're not sold on the idea of the Touch Bar, this slightly updated MacBook Pro is still the king of high-end laptops, especially for the creative class.
Cons:
Bottom Line:
Now you can ask Siri questions in silence.
Hard numbers say so, though these digital helpers continue to gain users.
There are many reasons for this change, but our MIT colleague David Autor and his collaborators have identified the central one: that the US middle class was built on routine work (both physical, like staffing an assembly line in a factory, and cognitive, like handling payroll for the factory) and this work has been rapidly automated in recent decades.
Tuesday, July 4, 2017
Happy Fourth of July! Have you made your computer backups yet?
You Need A Backup!
Yes, you. If you keep personally valuable files on your computer, such as wedding photos & videos or grandchild’s wedding photos and videos, files related to taxes, and files related to your occupation-then for Heaven’s Sakes GET A BACKUP DRIVE! They’re on sale! Tonight! Tomorrow! Here are the links!
1 Tb Western Digital USB External Backup Drive from Wal-Mart With In-Store Pick-up.
Costco will close tomorrow for the 4th ,so if you make your regular dogfood and beer run there on Wednesdays; stop by the electronics section for a good deal on a backup drive, too! The hardest part will be getting the drive out of the darn clamshell packaging!
And I’m just as bad as you may be. I’ve got a laptop I haven’t backed up in 333 days! So when I got home tonight, I plugged in my little 1TB backup drive to start the process.
But I have a wonderful new MacBook Pro with all USB-C! How the Hell do I connect my HDTV to it, among other questions?
You Need A Backup!
Yes, you. If you keep personally valuable files on your computer, such as wedding photos & videos or grandchild’s wedding photos and videos, files related to taxes, and files related to your occupation-then for Heaven’s Sakes GET A BACKUP DRIVE! They’re on sale! Tonight! Tomorrow! Here are the links!1 Tb Western Digital USB External Backup Drive from Wal-Mart With In-Store Pick-up.3 TB Western Digital USB External Backup Drive, 8 TB Seagate USB External Backup Drive. 500 GB FW800/USB 3.0 drive from LaCie, and 4 TB USB-C (Design by Porsche!) External Backup Drive from LaCie, all at Fry’s this week. And don’t forget to sign up for those promo codes, as they can save you money!Costco will close tomorrow for the 4th ,so if you make your regular dogfood and beer run there on Wednesdays; stop by the electronics section for a good deal on a backup drive, too! The hardest part will be getting the drive out of the darn clamshell packaging!How to start backing up your laptop! And I’m just as bad as you may be. I’ve got a laptop I haven’t backed up in 333 days! So when I got home tonight, I plugged in my little 1TB backup drive to start the process. But I have a wonderful new MacBook Pro with all USB-C! How the Hell do I connect my HDTV to it, among other questions?Roman Loyola of Macworld researched the dilemma of finding the right USB-C & Thunderbolt 3 adaptors for your MacBook Pro here. Have at it.
